
Introduction
Overview of GroceryHub: 10 Minute Demo App | The Ultimate Multi Vendor Grocery Solution
GroceryHub: 10 Minute App is a complete Quicke Commerce & eCommerce multi-vendor grocery solution designed for seamless online shopping and efficient order management. With location-based ordering, a smart multi-cart system, and admin-controlled cart restrictions, GroceryHub: 10 Minute App ensures a smooth shopping experience. It features a flexible return system, multiple payment gateways, and diverse delivery options, including scheduled delivery, standard delivery, and self-pickup. Whether you're launching a grocery marketplace or optimizing operations, GroceryHub: 10 Minute App is your all-in-one eCommerce solution.
This documentation provides a clear overview of the entire system, summarizing the core processes for easy understanding. The platform includes an intuitive admin panel and landing page, designed for seamless use without any coding expertise. It also integrates multiple automated online payment gateways, simplifying global transactions effortlessly.
Thank you for choosing GroceryHub: 10 Minute App If you have any questions not covered in this documentation, please feel free to reach out to us via email(info@apksoftwaresolution.com). We’re here to assist and will respond as promptly as possible. Thank you again!
Server Requirements
All server requirements are stated bellow
The following server requirements outline the essential specifications for setting up and running the system efficiently. Meeting these requirements will ensure smooth operation, enhance performance, and support seamless functionality across all features. Please verify your server configuration aligns with these standards prior to installation.
- PHP Version 8.3
- MySQL Version 8.0+ or MariaDB version 10.6+
- BCMath PHP Extension
- Ctype PHP Extension
- cURL PHP Extension
- DOM PHP Extension
- Fileinfo PHP Extension
- GD PHP Extension
- JSON PHP Extension
- Mbstring PHP Extension
- OpenSSL PHP Extension
- PCRE PHP Extension
- PDO PHP Extension
- pdo_mysql PHP Extension
- Tokenizer PHP Extension
- XML PHP Extension
- Filter PHP Extension
- Hash PHP Extension
- Session PHP Extension
- Zip PHP Extension
- allow_url_fopen()
- file_get_contents()
Installation
Application installation process
Before starting admin panel installation make sure website installation done successfully. If you have done website installation on
https://yordomain.com https://yordomain.com/admin/auth/login- username:admin@gmail.com
- password:demo1234
Note:- We strongly recommendat you after successfully installation. Update all necessary setting here to run Website smoothly.
- Google Map Setting
- Store Setting
- Country Setting
- Payment Gateway Setting
- Mail Setting
- Firebase Setting
- Add atleast one City & Location
- Add atleast one category and subcategory
- Add atleast one seller
- Add atleast one Product
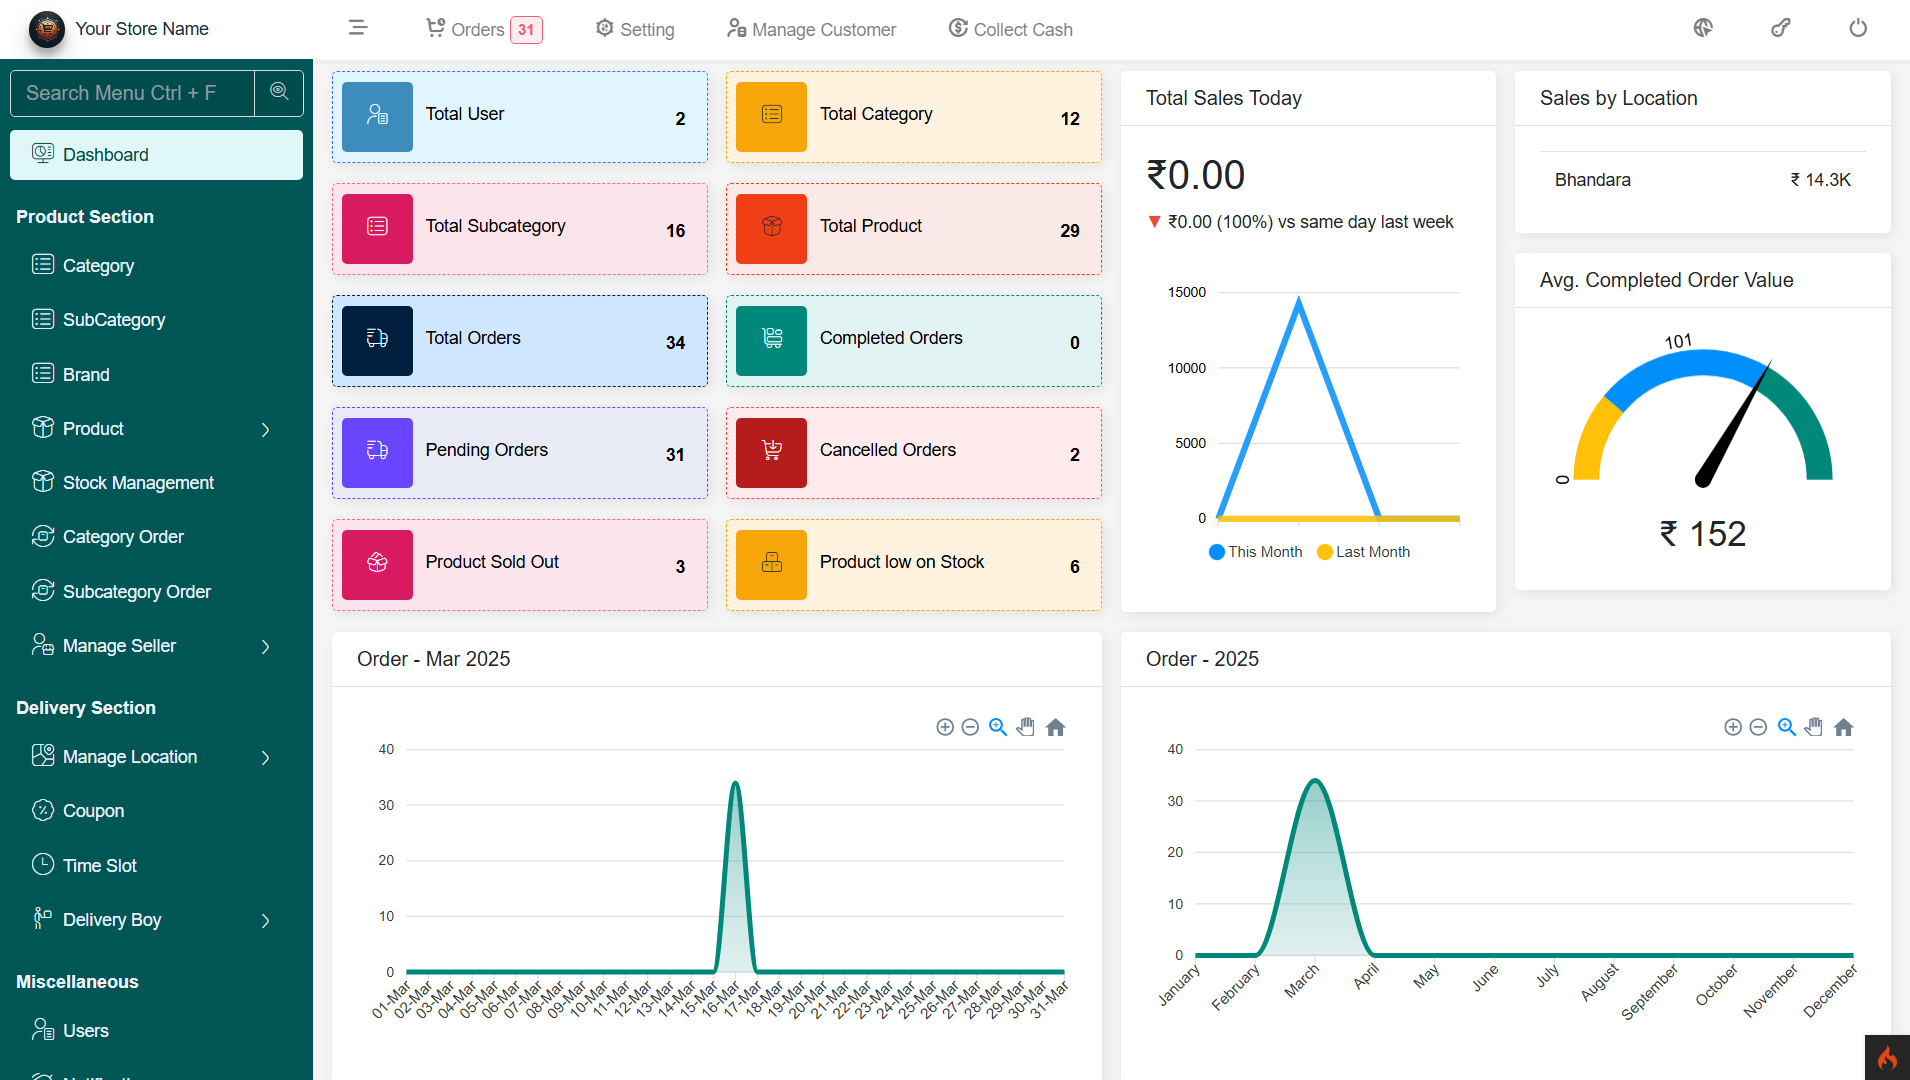
Admin Dashboard
Overview of the admin dashboard
The items include the latest secure admin panel with a unique admin dashboard. By logging into your dashboard, you can easily view and manage all key information related to your website. From this dashboard, you'll get a comprehensive overview of your system, including order status, total today sales , stock management, and more. Additionally, you can track and compare system transactions with graphical data for better insights.
Products
The Product Management section in the admin panel allows administrators to efficiently manage products, handle bulk operations, and oversee product-related orders.
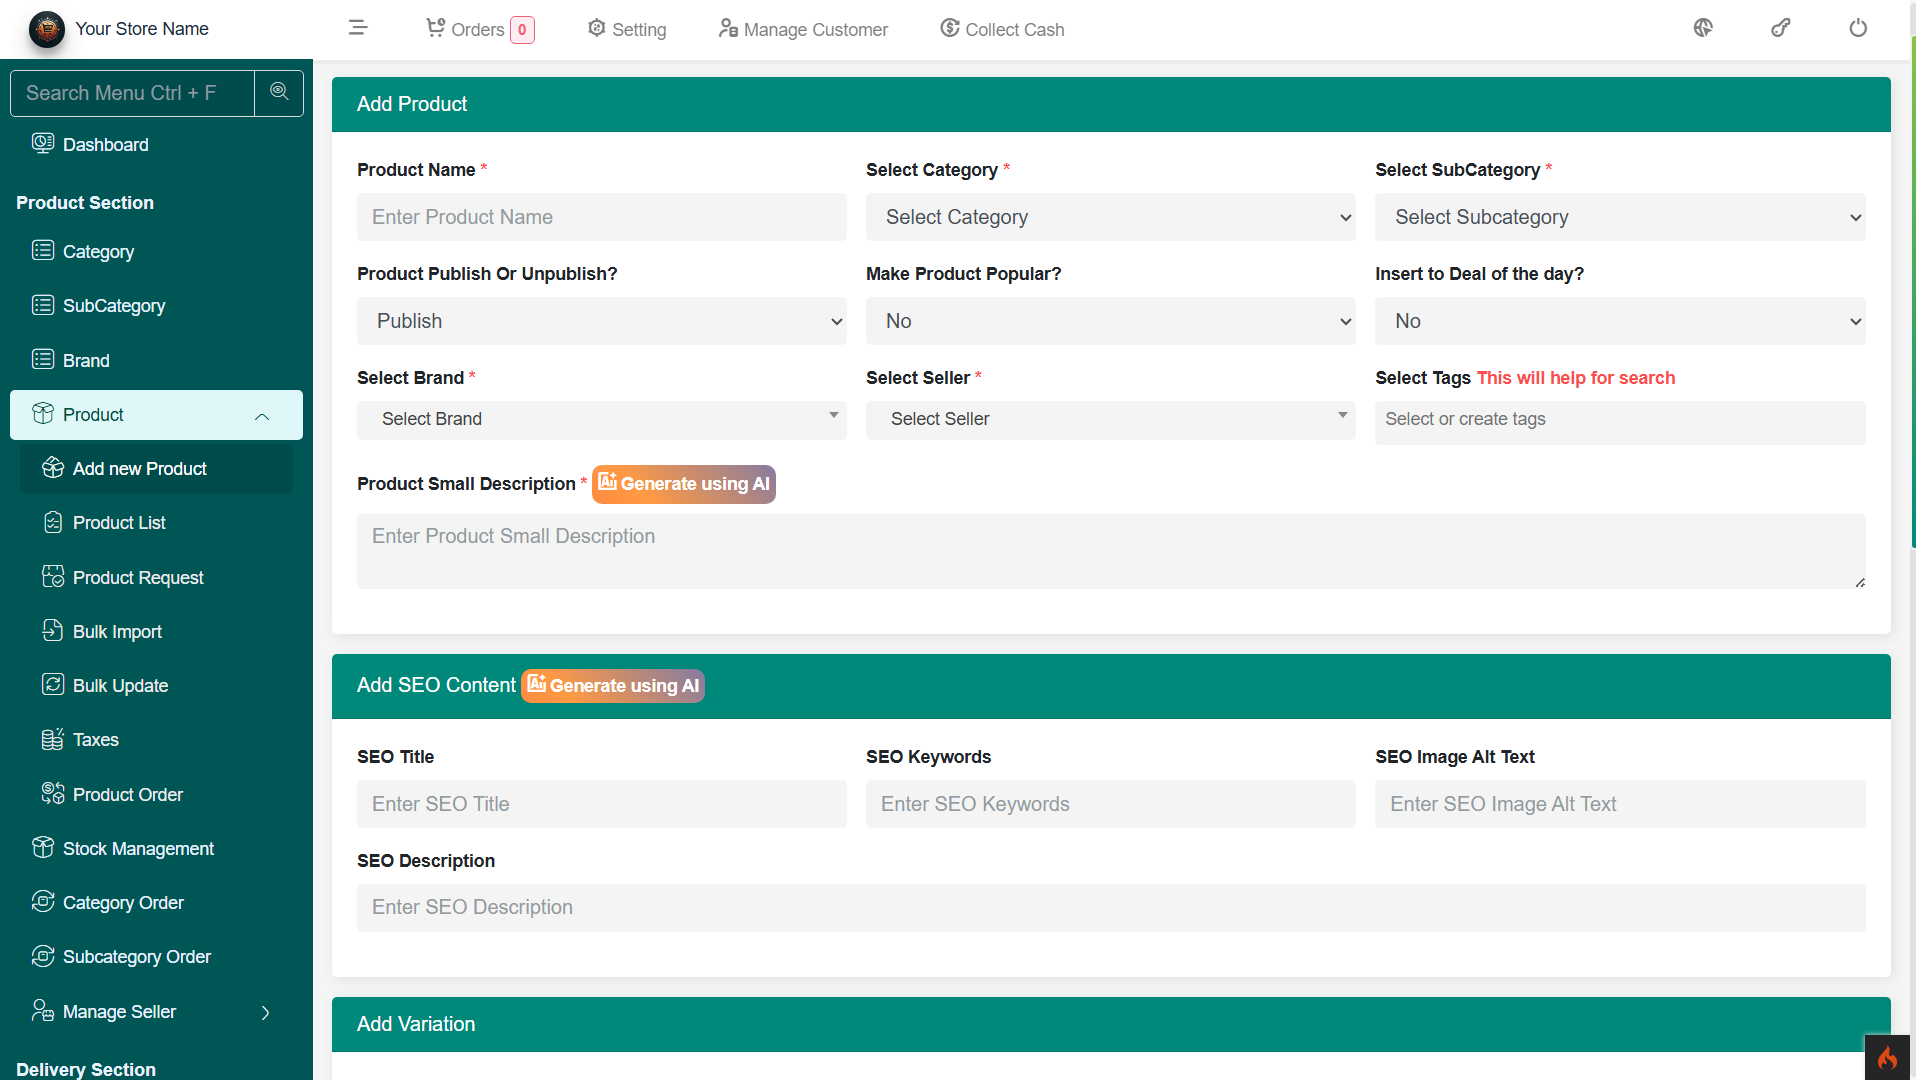
Add New Product
This section enables the admin to add new products to the store. It includes fields for product details such as:- Product Name, Category & Subcategory, Brand & Seller Details
- Description & Specifications
- Product Images
- Pricing Variaion (Regular Price, Discounted Price)
- Stock & Inventory Management
- Tax Settings
- SEO Settings (Meta Title, Description, Keywords)
- Product Visibility & Status (Active/Inactive)
- Create Product Description Using ChatGPT
- Create Product SEO Content Using ChatGPT
-
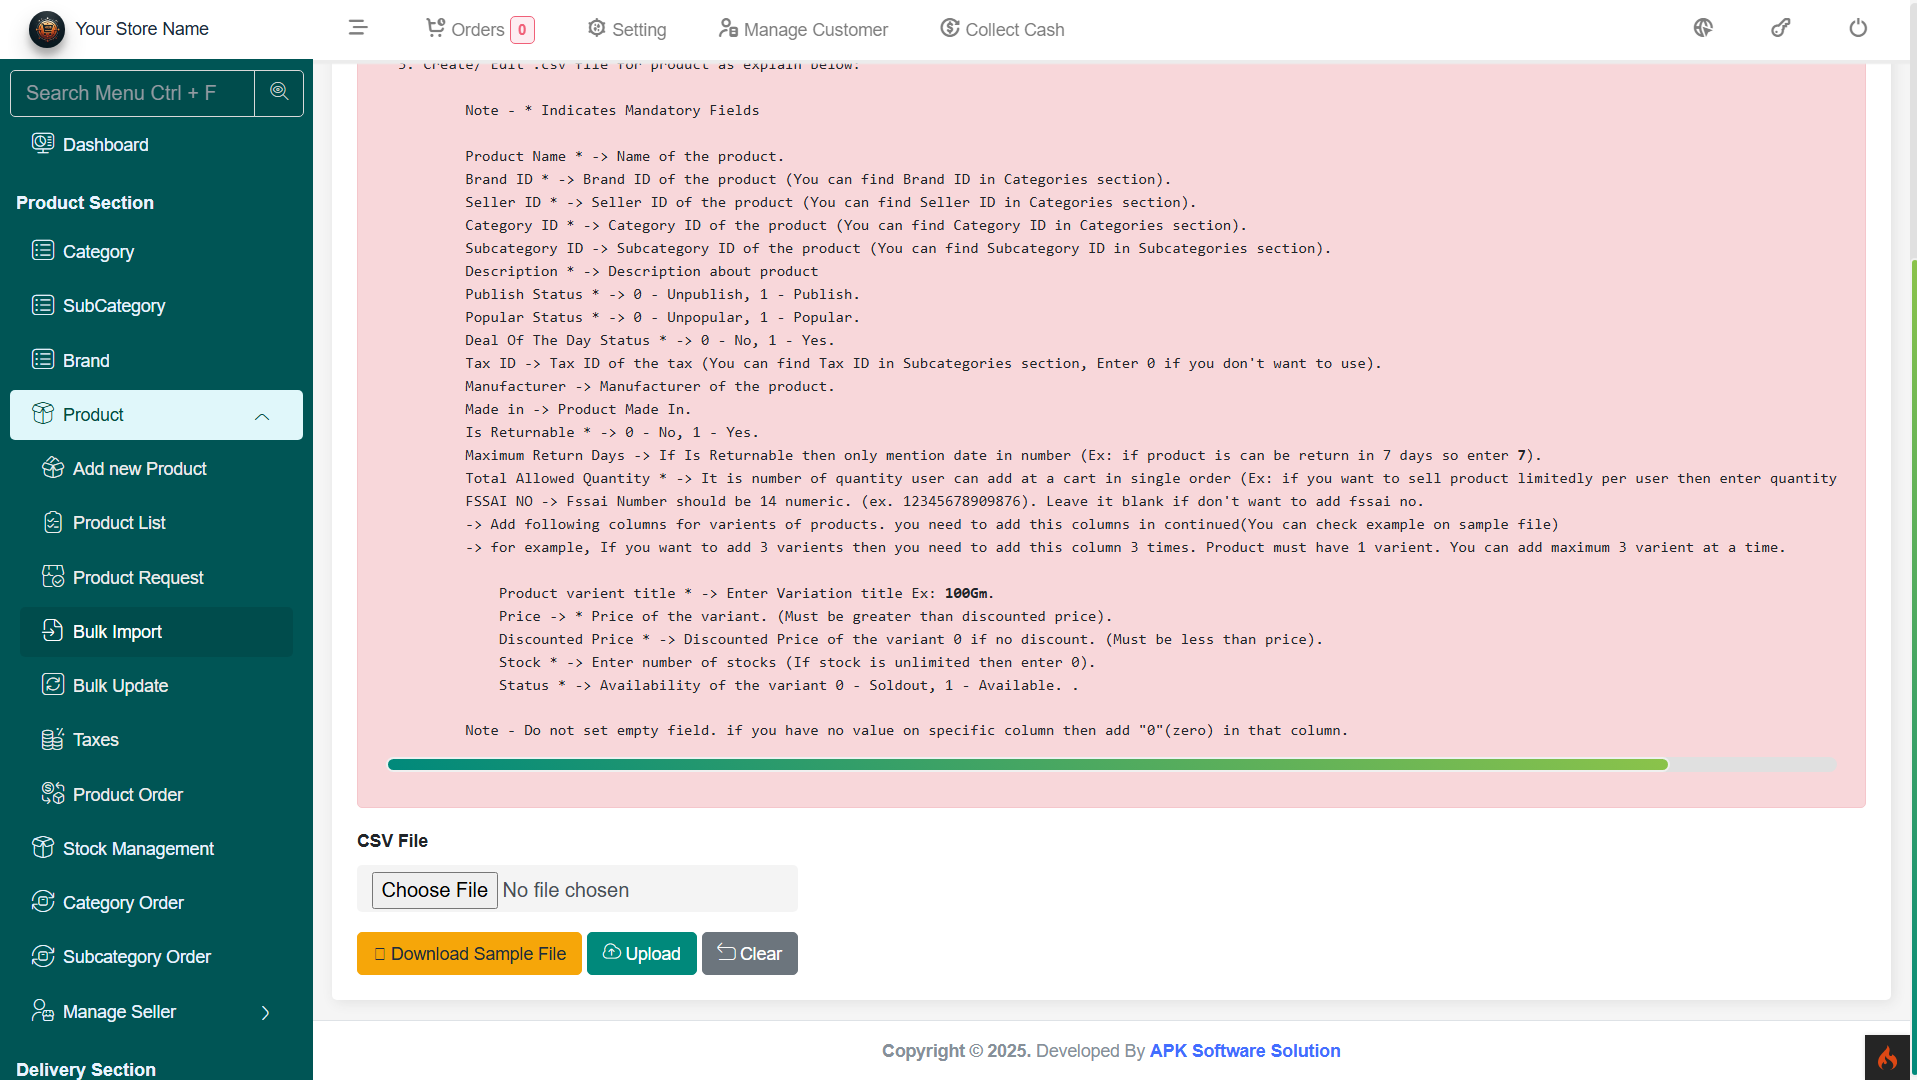
Bulk Import
Allows the admin to upload multiple products at once using a CSV/Excel file. Key features:- CSV format template for easy bulk upload
- Mapping product details (Name, Price, Category, Stock, etc.)
-
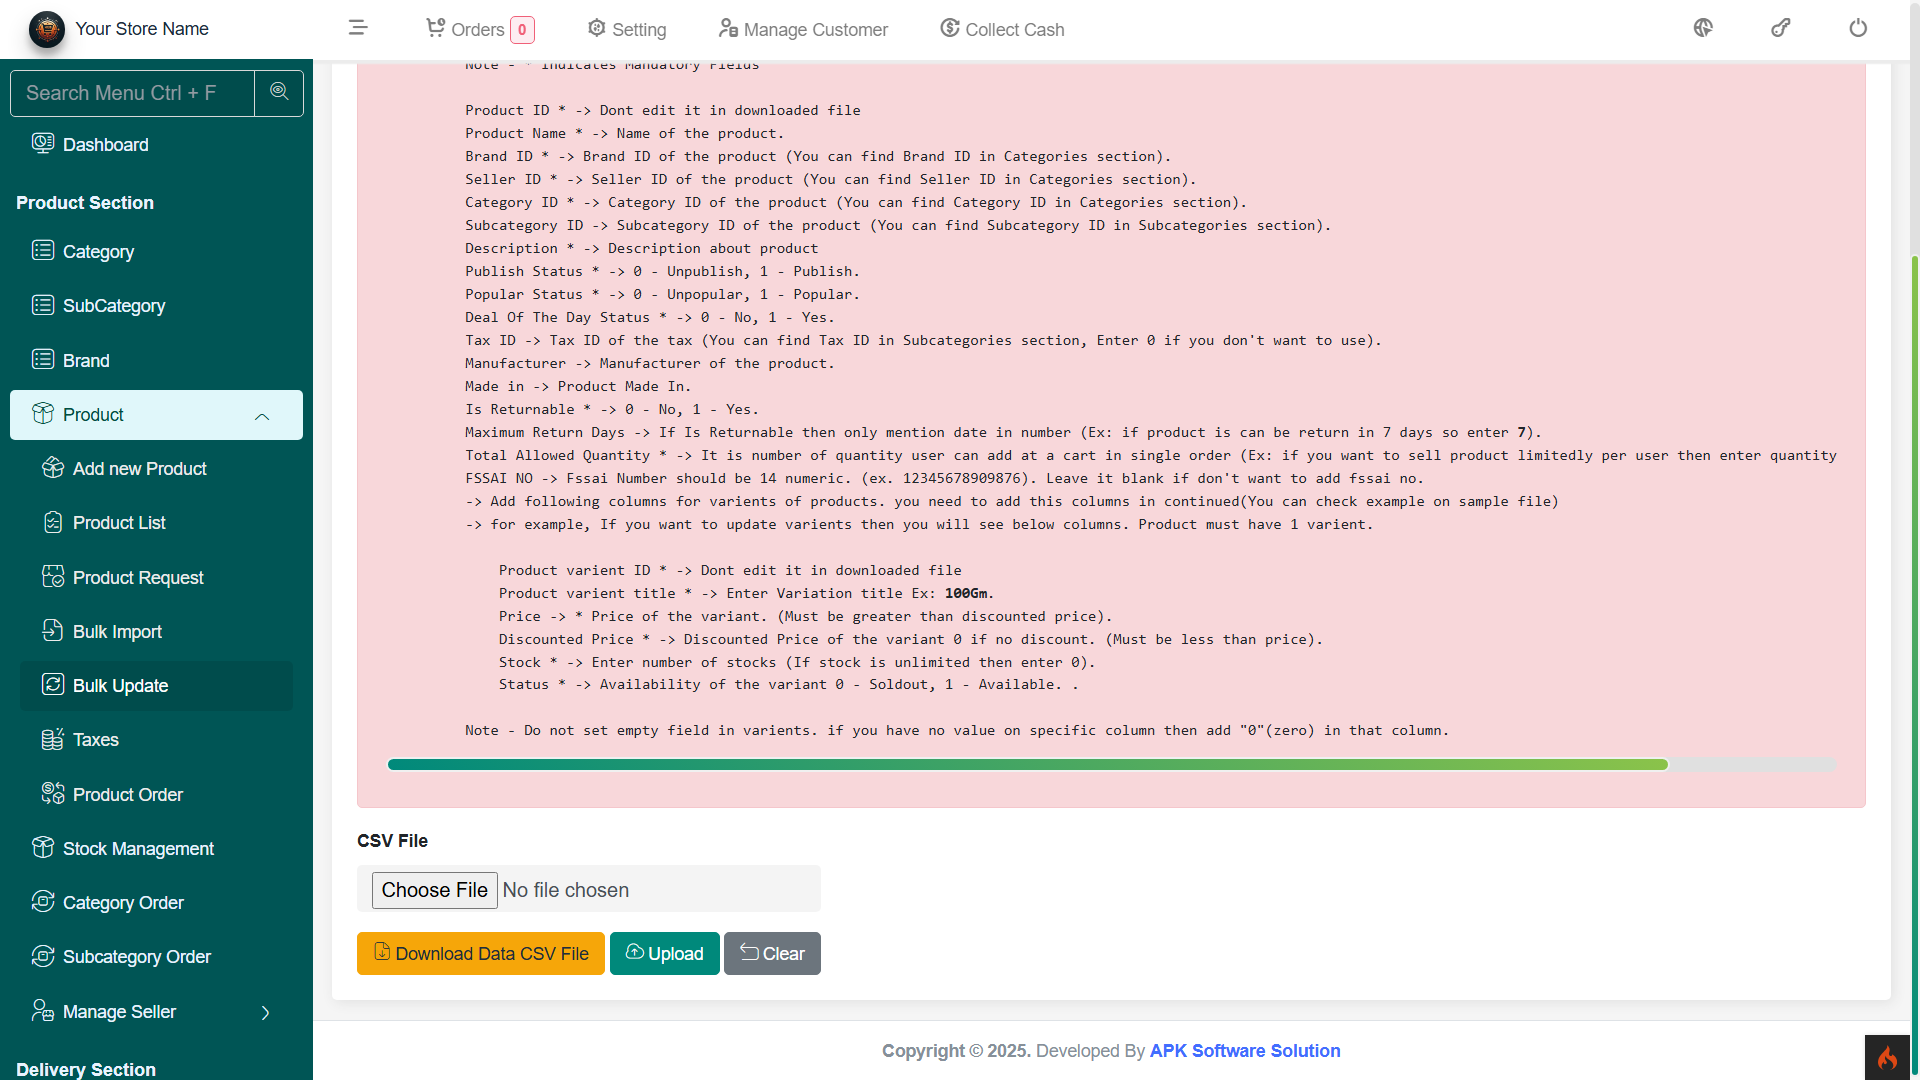
Bulk Update
This feature lets the admin update product details in bulk instead of editing them individually. Possible updates include:- Price changes
- Stock quantity updates
- Category modifications
- Status changes (Active/Inactive)
- Tax adjustments
-
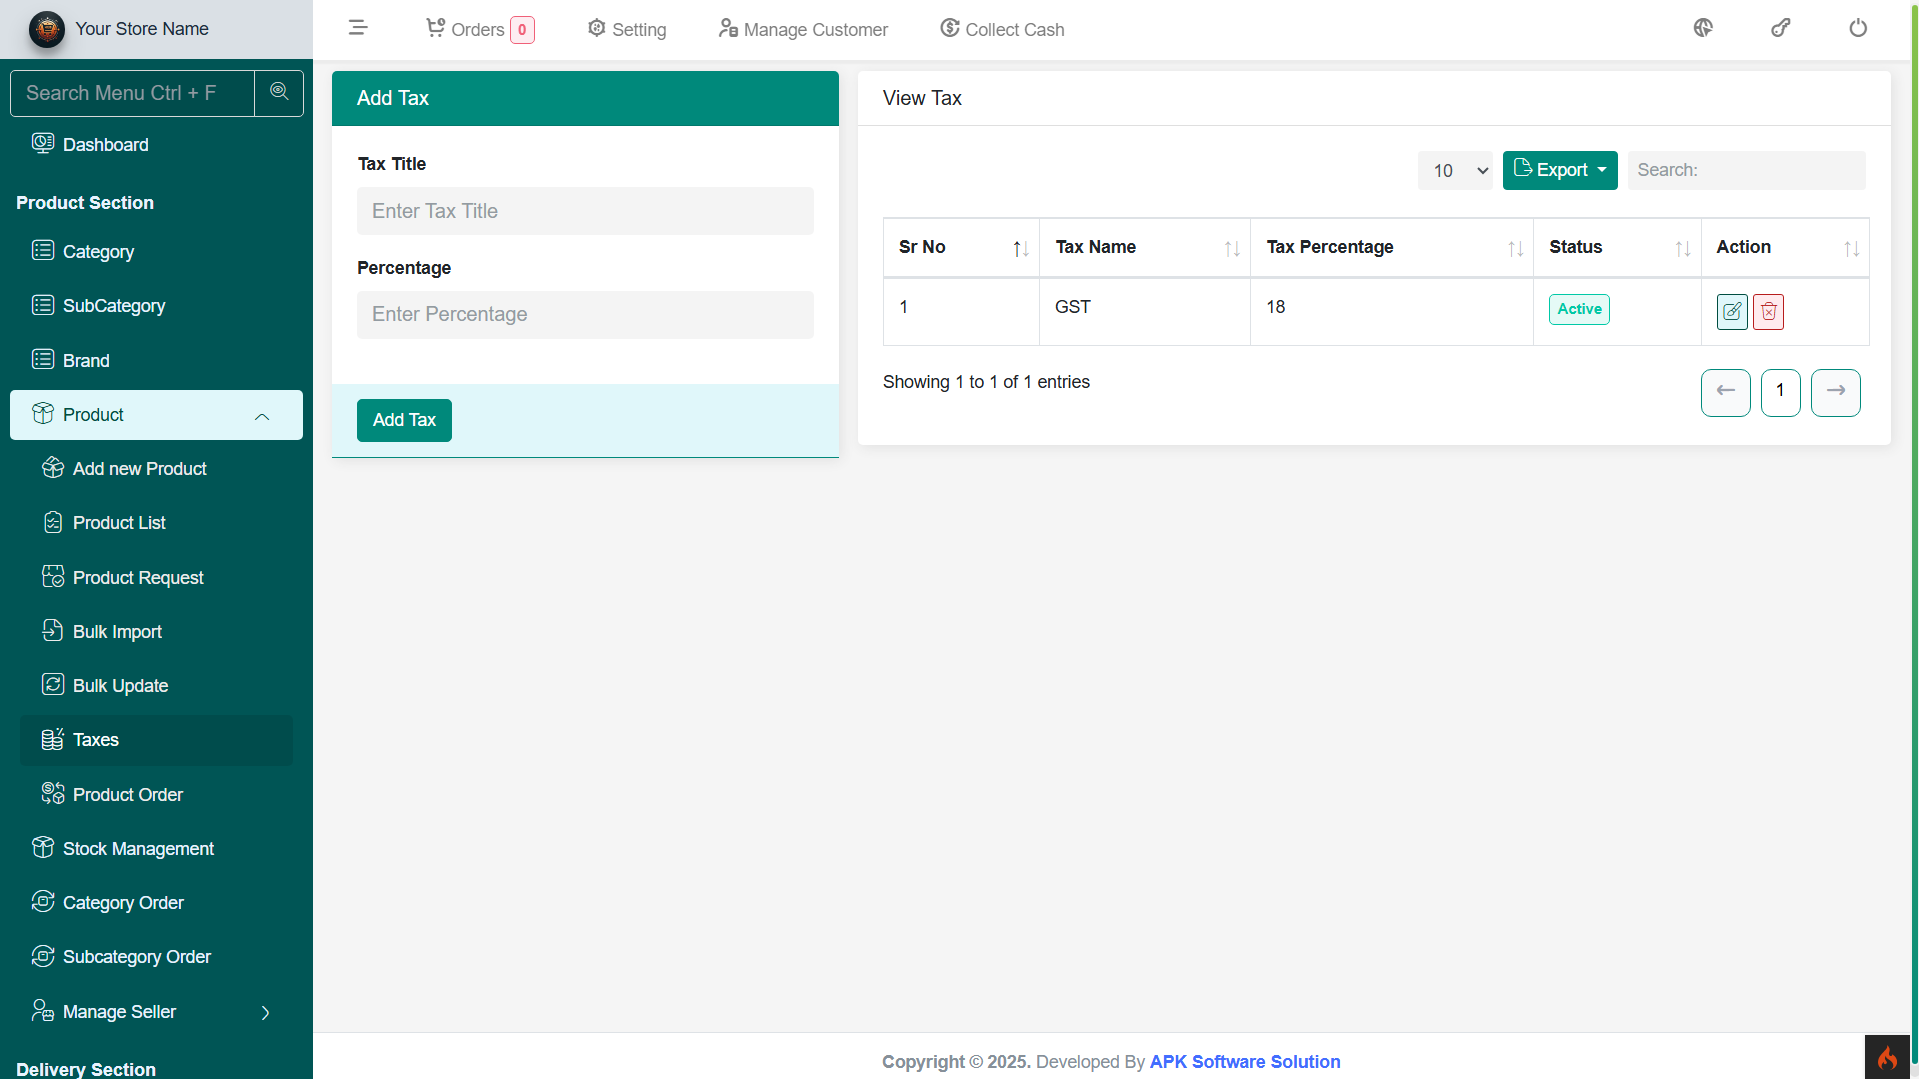
Taxes
Manage tax settings for products. The admin can:- Define tax slabs (GST, VAT, etc.)
- Apply taxes to specific products
-
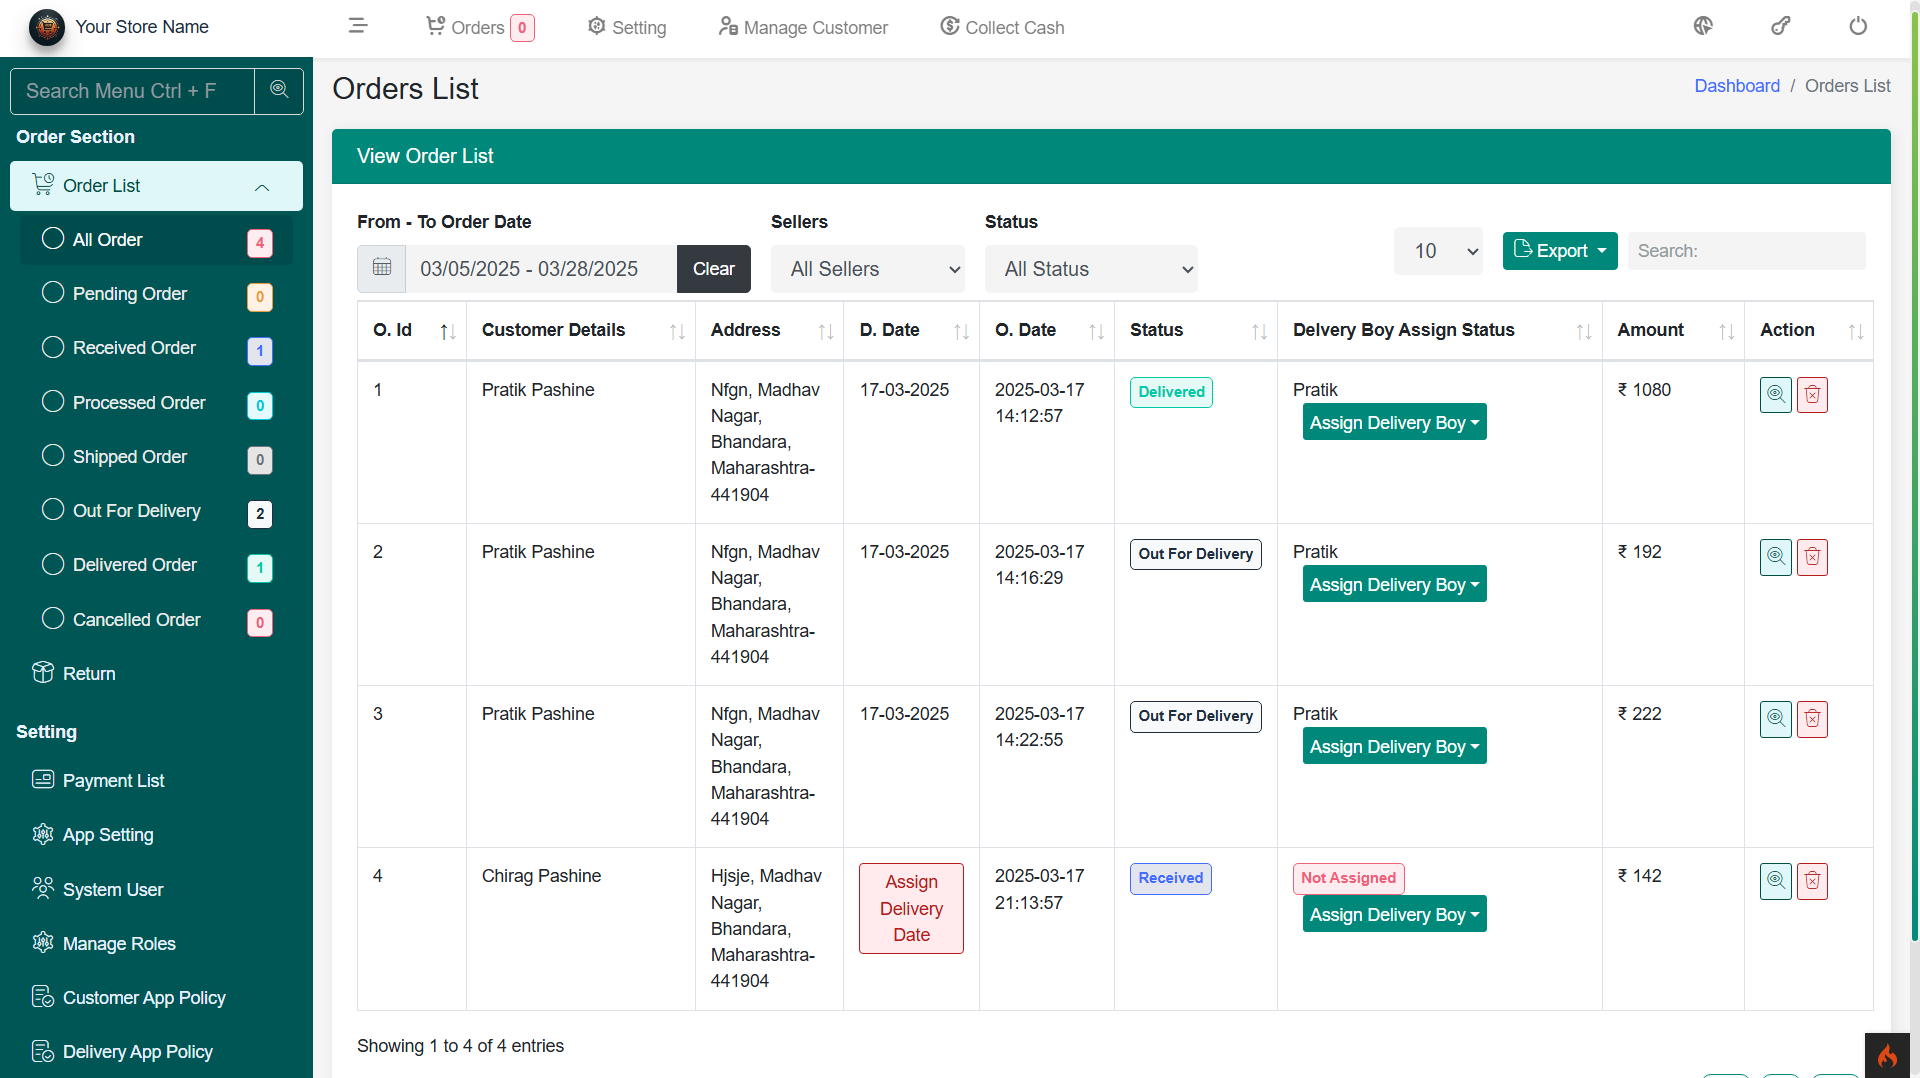
Orders
Overview of the Orders
The Orders section in the admin panel allows administrators to efficiently manage customer orders, track order statuses, and handle payment processing. This ensures smooth order fulfillment and customer satisfaction.
Key Features:
- Order Management – View, filter, and search customer orders based on order ID, customer name, date, or status.
- Order Status Updates – Change order statuses (Pending, Processing, Shipped, Delivered, Cancelled, Refunded).
- Payment Tracking – Check payment details for online transactions (e.g., Razorpay, PayPal, COD, Paystack, Cashfree & many more coming soon).
- Invoice & Billing – Generate and download invoices for customer orders.
- Order Assignments – Assign orders to delivery agents for tracking.
- Returns & Refunds – Manage return requests and process refunds.
- Order Notifications – Send automated Mobile app notifications to customers about their order status.
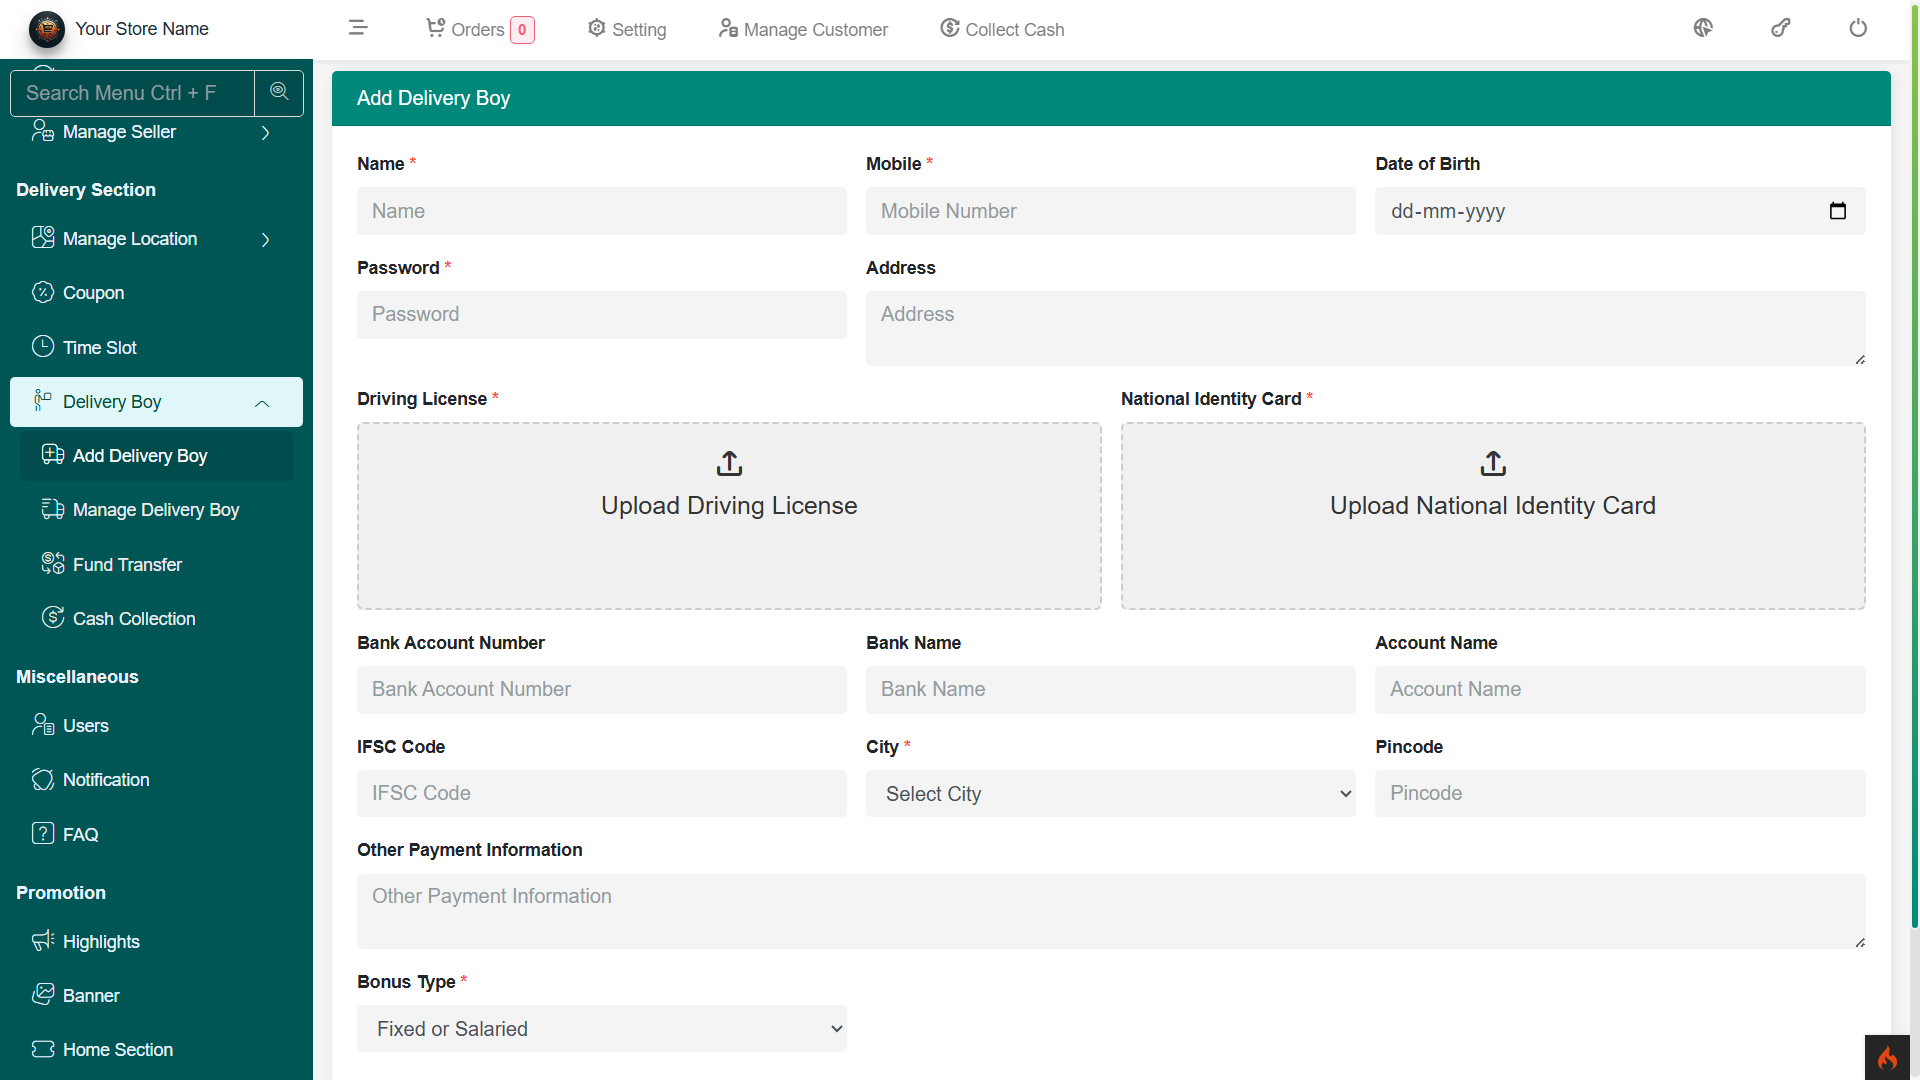
Delivery Boy
Overview of Delivery Boys
The Delivery Boy section in the admin panel helps administrators manage delivery personnel, handle financial transactions related to order deliveries.
Delivery Boy Section – Admin Panel
The Delivery Boy section in the admin panel helps administrators manage delivery personnel, handle financial transactions related to order deliveries.Add Delivery Boy
Admin can add new delivery personnel by entering details like:- Name, Mobile Number, Email
- Address & Assigned Service Area
- Vehicle Details (if required)
- Profile Photo & ID Verification
- Login Credentials (Username & Password)
- Status (Active/Inactive)
-
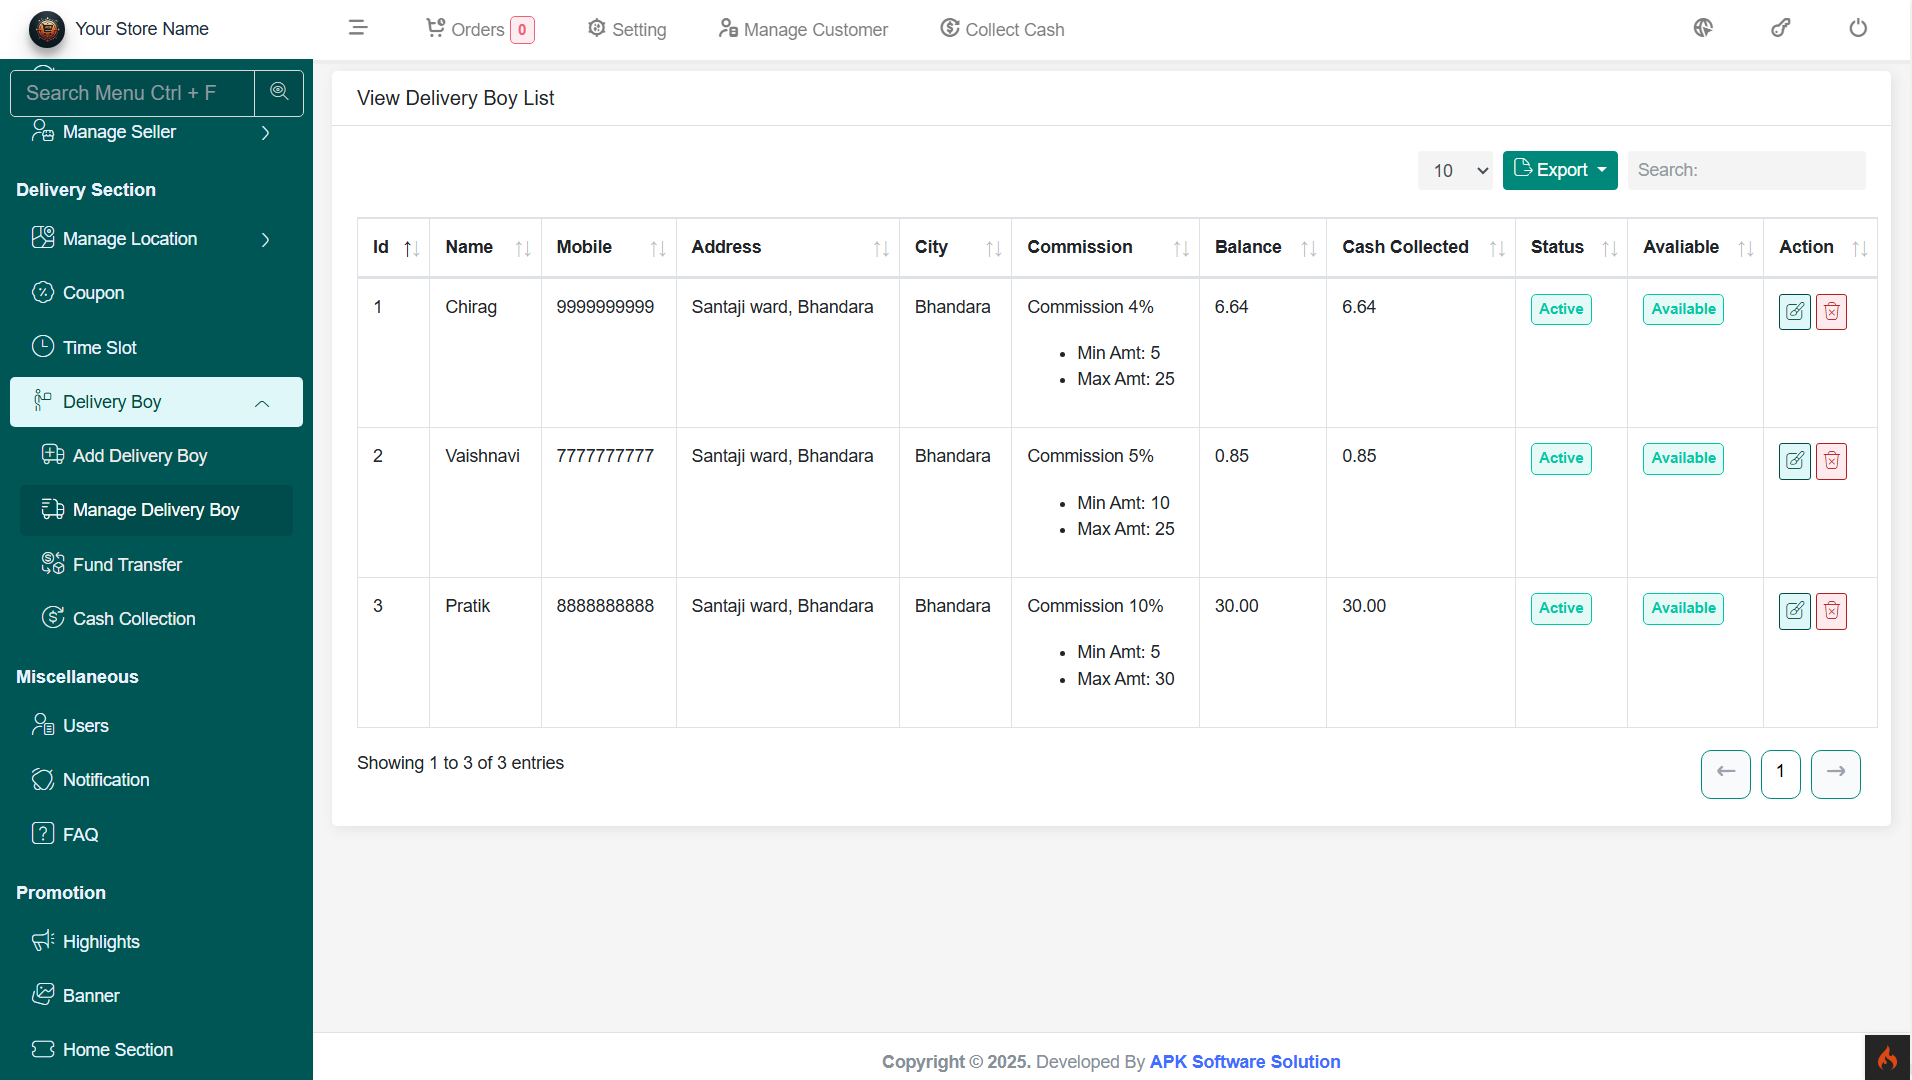
Manage Delivery Boy
View and manage the list of registered delivery boys. Features include:- Search, filter, and sort delivery agents
- Edit/update delivery boy details
- Activate/deactivate delivery accounts
- Track performance (total deliveries)
- Assign/unassign orders
-
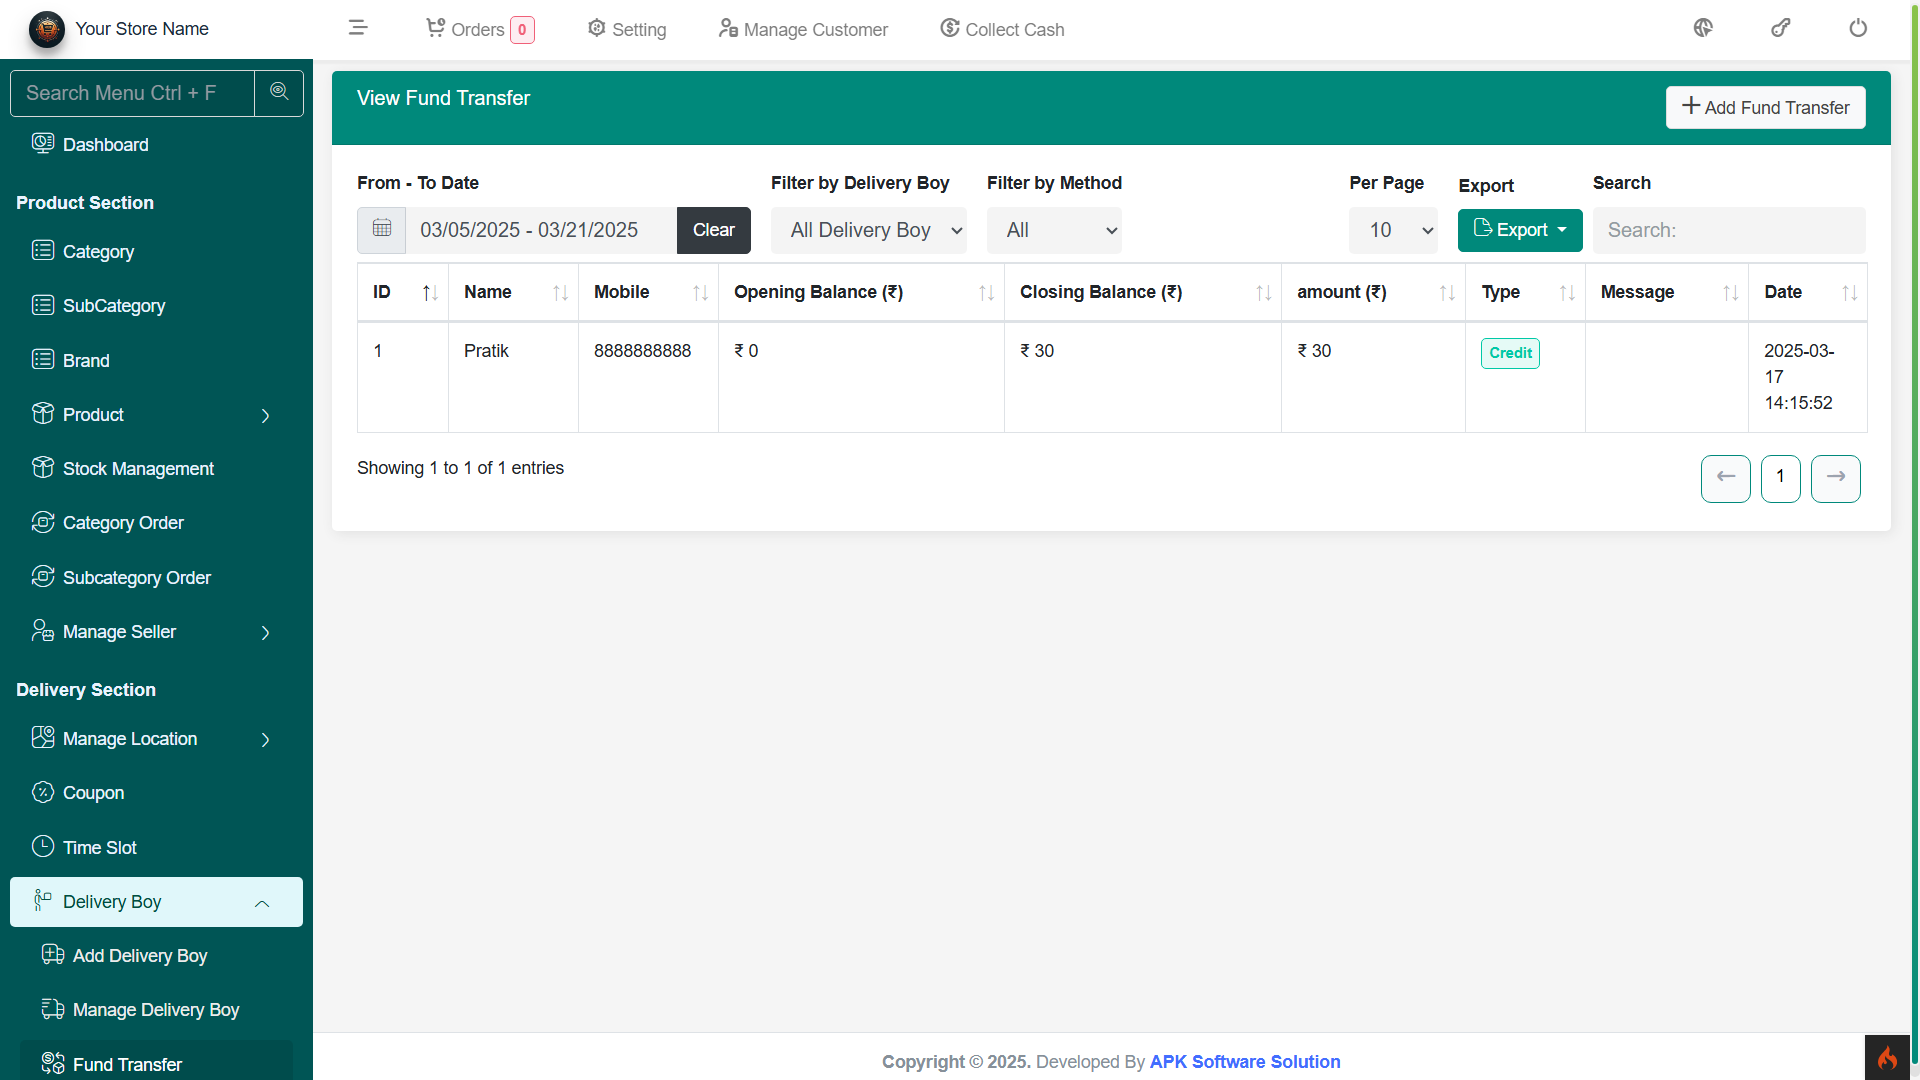
Fund Transfer (Commission Payouts to Delivery Boys)
Transfer earned commissions from completed deliveries to the delivery boy’s wallet. Features:- Approve & process payouts manually
- View transaction history (date, amount, status)
- Filter payouts based on delivery boy, date, or amount
-
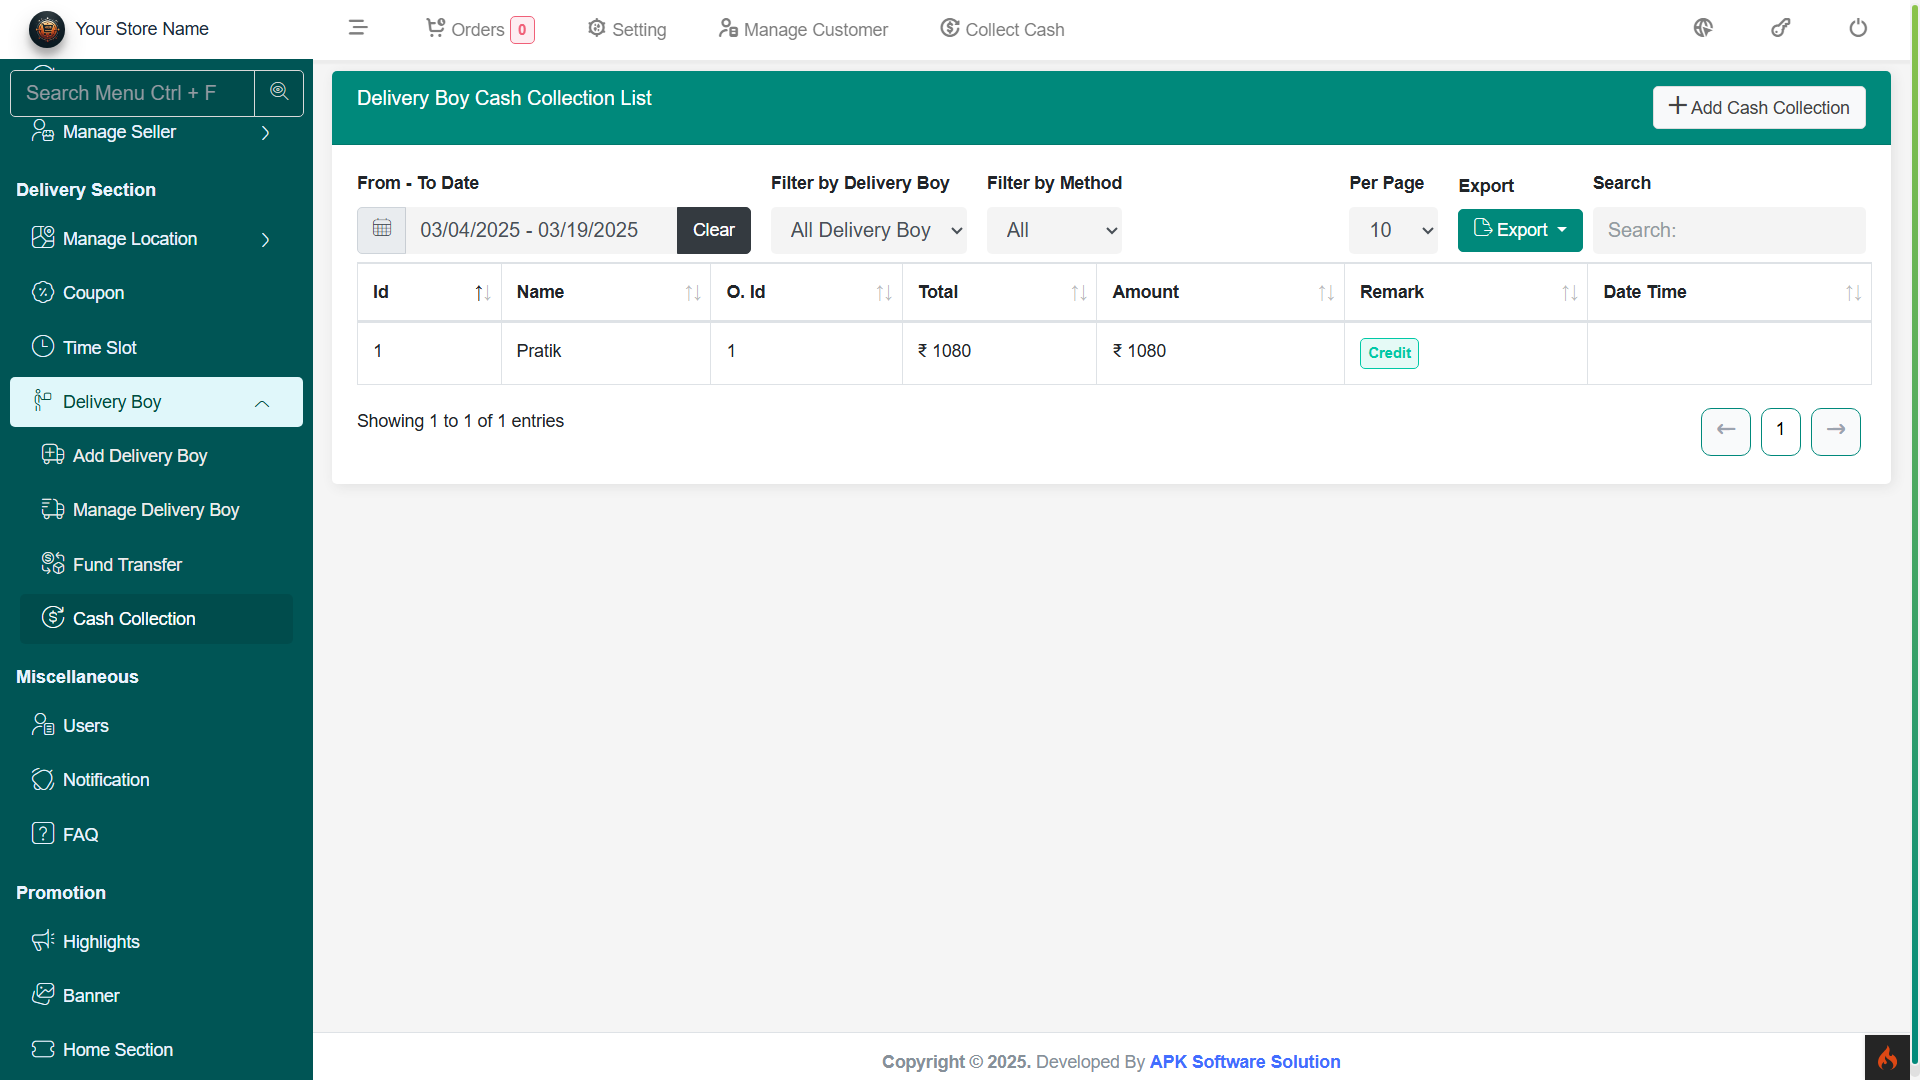
Cash Collection (COD Order Settlement)
Manage cash collected by delivery boys for Cash-on-Delivery (COD) orders. Features:- Track collected cash from completed COD orders
- Verify and reconcile cash deposits
- Generate cash collection reports
- View transaction history (date, order details, collected amount)
-
AI Insight Report
Overview of the platform Deposit
The AI Insight Report provides a detailed analytical overview of sales performance, top-selling products, order statistics, and business insights. This report helps administrators make data-driven decisions to improve sales and customer experience.
Sales & Reports Section – Admin Panel
This section provides comprehensive insights into sales performance, top-selling products, and payment trends, helping administrators refine their business strategies.Report Filters
- Selling Report Start Date & End Date – Select a custom date range to analyze sales performance within a specific period.
- Refresh Report Button – Instantly update and fetch the latest report based on the selected date range.
Sales Summary Overview
This section provides key metrics at a glance:- Total Orders – Displays the total number of orders received within the selected period.
- Total Revenue – Shows the total earnings from all orders.
- Total Discounts – Displays the total discount amount applied to orders.
- Total Refunds – Indicates the total amount refunded to customers.
Top-Selling Products
- Lists the best-performing products based on sales volume.
- Shows product names and their respective sales counts.
- Helps identify popular products that contribute significantly to revenue.
Order Analysis & Payment Insights
- Order Summary – Displays the number of orders, revenue, discounts applied, and refund statistics.
- Orders by Payment Methods – Breaks down the payment preferences of customers, including:
- Cash on Delivery (COD) – Most preferred payment method.
- Razorpay, Paystack, Cashfree – Digital payment methods used by customers.
Business Insights & Recommendations
- Identifies trends in product performance (e.g., strong demand for food items).
- Highlights customer payment preferences, helping admins optimize checkout options.
- Suggests strategies to:
- Improve inventory for best-selling products.
- Enhance product images and descriptions for better customer trust.
- Offer return incentives to boost customer retention.
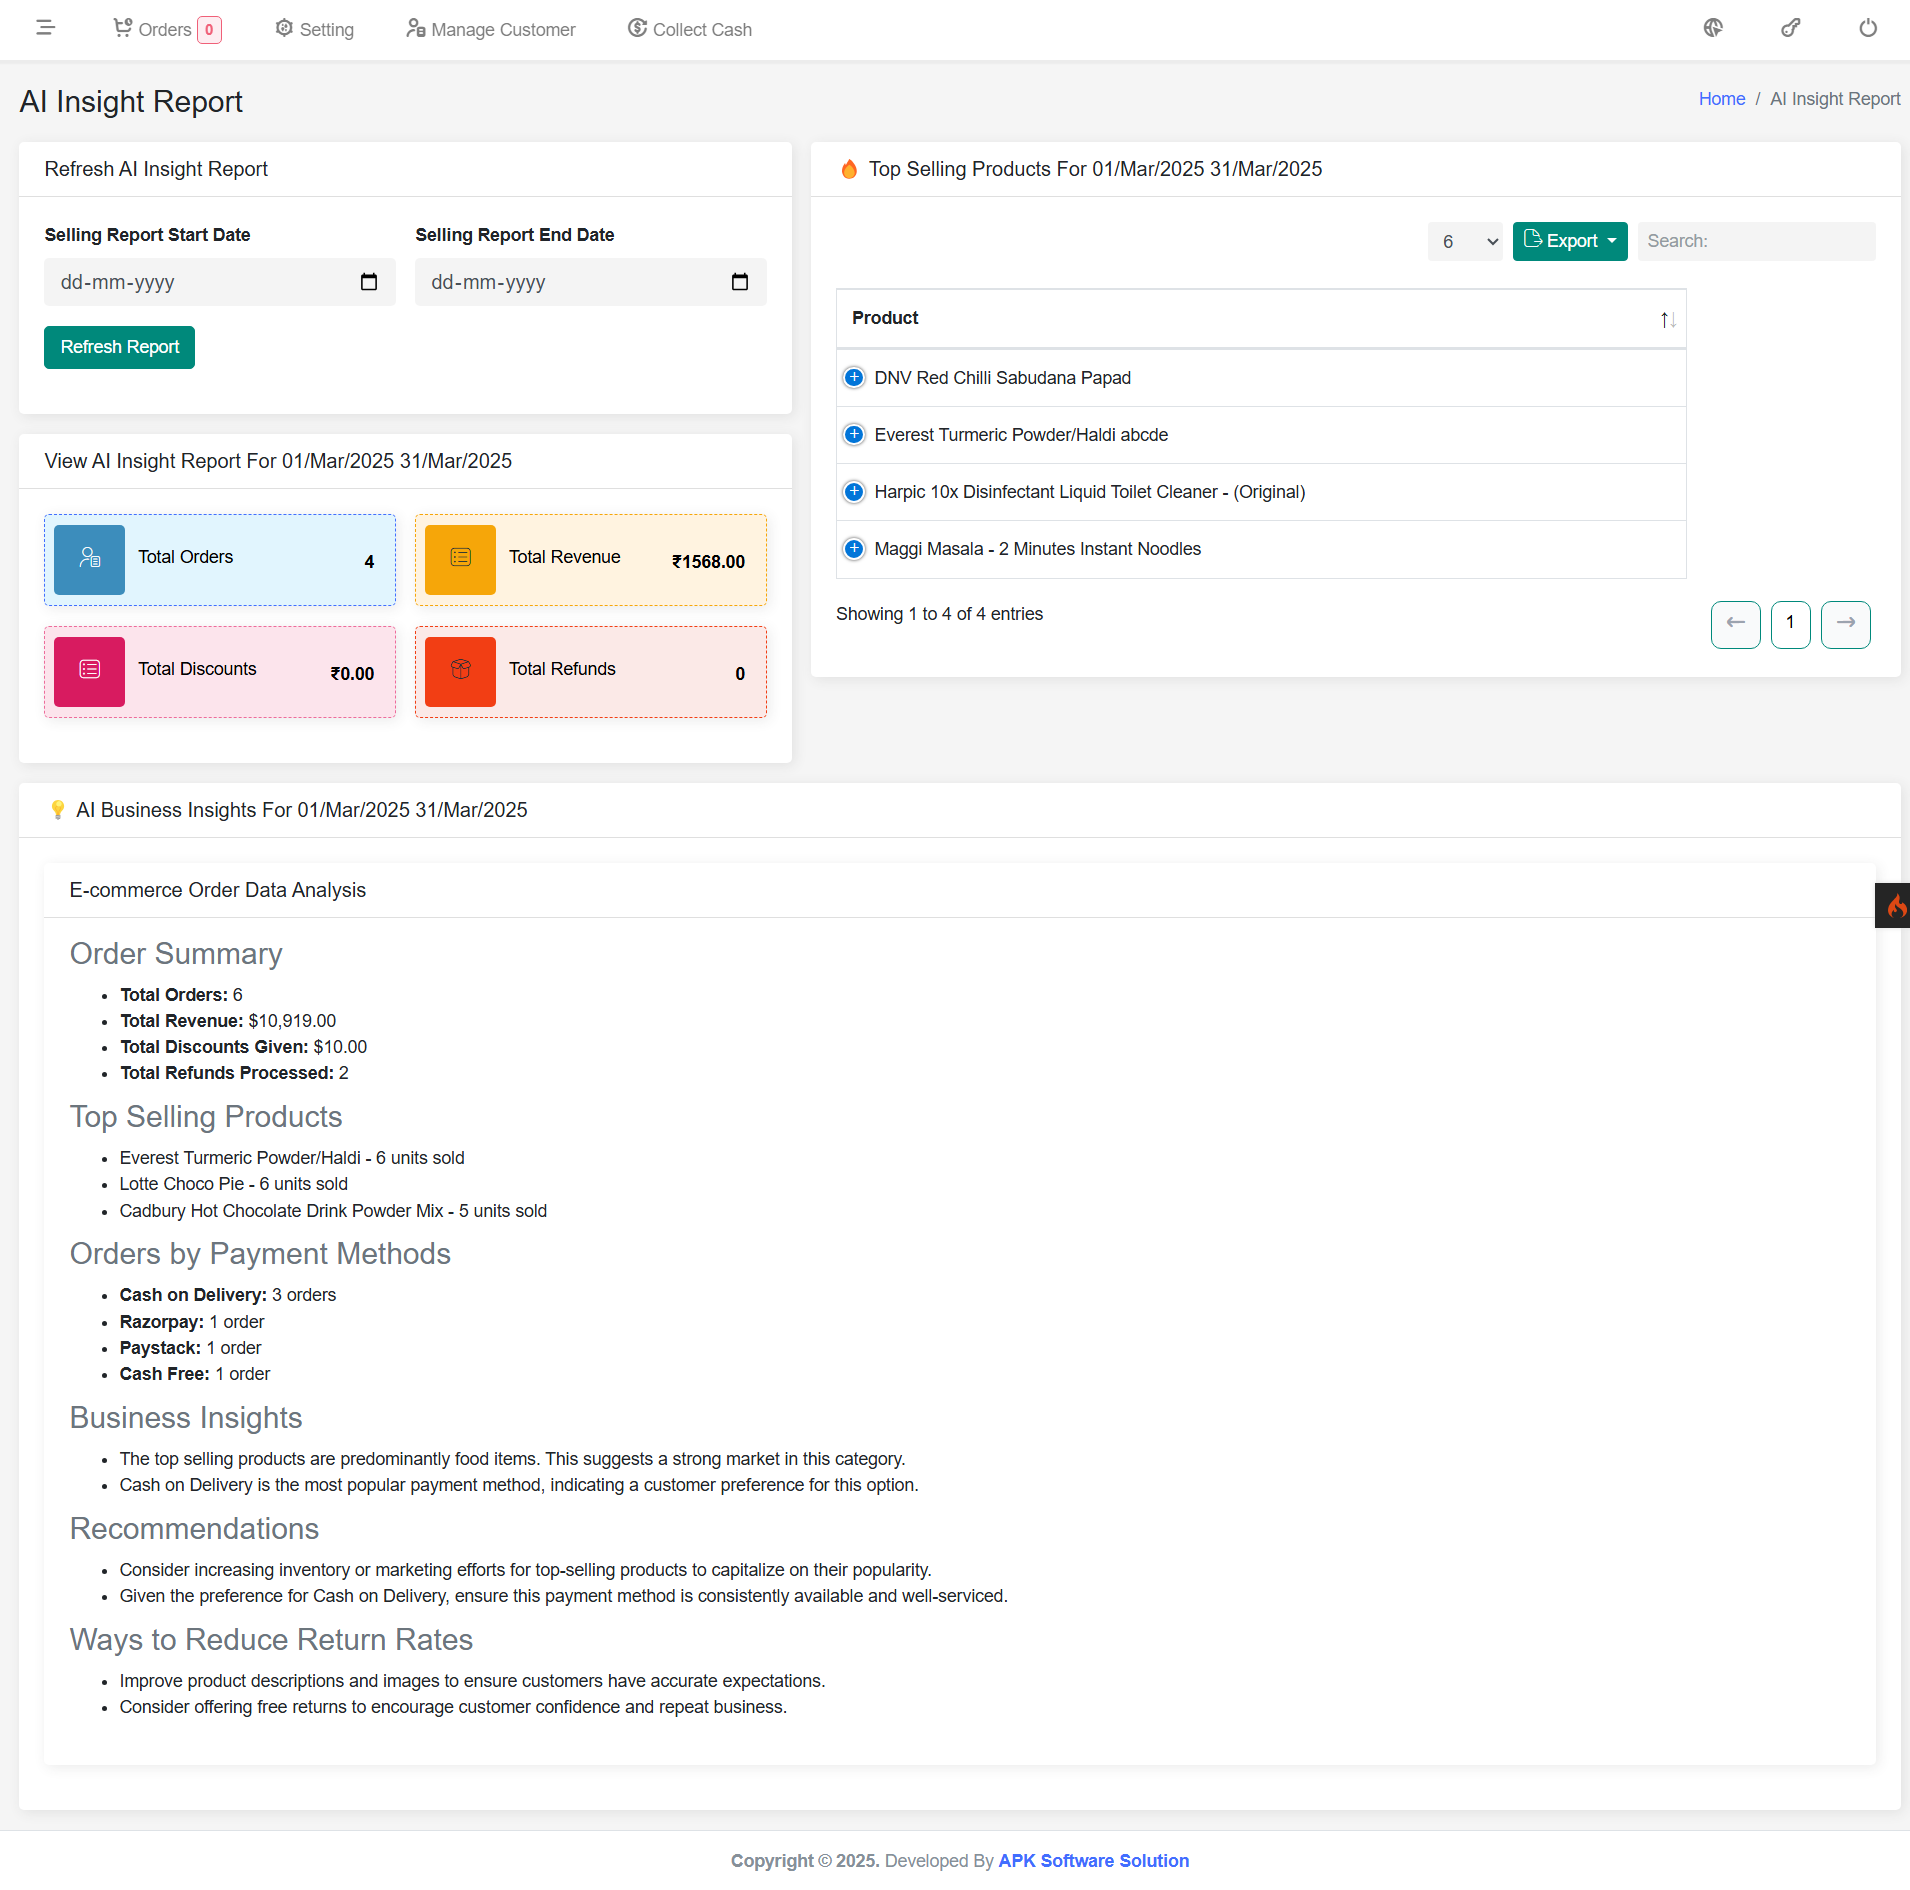
This AI-powered report provides a comprehensive view of business performance, allowing admins to refine their sales strategies and enhance customer satisfaction.
Seller Transaction
Overview of the Seller transaction
The Seller Transaction section in the admin panel provides a detailed overview of seller commission payouts, ensuring transparency and efficient financial management.
Commission Payouts
- Automated Commission Calculation – The system automatically adds commission amounts when an order status is marked as Completed.
- Commission Deduction – If an item is returned or refunded, the corresponding commission amount is directly deducted from the seller’s balance.
- Real-Time Updates – Transactions are updated dynamically, ensuring sellers always have an accurate view of their earnings.
Transaction History
- View Detailed Records – Admins can track all transactions, including commission earnings, deductions, and payouts.
- Filter & Search – Easily find specific transactions using filters based on seller name, date range, order ID, or amount.
- Export Reports – Generate and download reports for financial reconciliation.
Payout Processing
- Manual Payouts – Admins can process payouts manually.
Seller Balance & Adjustments
- Seller Wallet – Track available balances and pending payouts.
- Adjustments & Deductions – Admins can manually adjust balances in case of disputes or refunds.
- Notification System – Sellers receive alerts about payouts, deductions, and any pending balance adjustments.
This section ensures a smooth and transparent payout process, helping sellers track their earnings while allowing admins to manage commission settlements effectively.
Payment Gateway
Overview of the platform-integrated payment gateway
In the payment gateway section, you can configure and manage both automatic and manual payment gateways. This includes setting up preferred payment methods, ensuring secure transactions, and offering flexibility in payment options for a seamless user experience
Payment Gateway – Admin Panel
The Payment Gateway section allows admins to configure and manage different payment methods available for customer transactions. This ensures smooth and secure payment processing for all orders. The platform supports multiple payment gateways, including online and offline options.Available Payment Gateways
- Cash on Delivery (COD) – Customers pay in cash when receiving their orders.
- Razorpay Payments – Secure online payment processing for debit/credit cards, UPI, and wallets.
- PayPal Payments – International payment gateway for secure transactions.
- Paystack Payments – Popular payment gateway for African markets.
- Cashfree Payments – Instant and secure payment solutions for online businesses.
- Stripe Payments – Globally trusted payment gateway supporting credit/debit cards, wallets, and 135+ currencies for secure online transactions.
- PhonePe Payments – Leading Indian UPI-based payment gateway enabling instant payments via UPI, cards, and wallets.
- Paytm Payments – Popular Indian payment gateway supporting UPI, cards, net banking, and Paytm Wallet for seamless checkout.
- PayU Payments – Versatile payment gateway offering cards, UPI, net banking, and EMI options across multiple regions.
-

How to Configure Payment Gateways
Admins need to configure API credentials for each payment gateway before enabling them for customer transactions.Steps to Configure Payment Gateways:
- Go to Admin Panel → Payment List.
- Select the payment gateway you want to configure.
- Enter the required API credentials (API Key, Secret Key, etc.).
- Enable or disable the payment method as needed.
- Save the settings and test the payment gateway for transactions.
How to Get API Keys for Each Payment Gateway
Razorpay API Key & Secret Key
- Go to Razorpay Dashboard.
- Sign in and navigate to Settings → API Keys.
- Generate a new key and copy the API Key & Secret Key.
PayPal API Credentials
- Go to PayPal Developer Dashboard.
- Log in and create a new REST API app.
- Retrieve the Client ID and Secret Key for sandbox or live mode.
Paystack API Keys
- Go to Paystack Dashboard.
- Log in and navigate to Settings → API Keys.
- Copy the Public Key, Secret Key, and Live Mode settings.
Cashfree API Keys
- Go to Cashfree Dashboard.
- Sign in and access Developers → API Keys.
- Generate and copy the App ID and Secret Key.
Stripe API Keys
- Go to Stripe Dashboard.
- Sign in and navigate to Developers → API Keys.
- Copy the Publishable Key and Secret Key (use test keys for sandbox, live keys for production).
PhonePe API Keys
- Go to PhonePe Business Dashboard.
- Sign in and navigate to Developer Settings → API Keys.
- Copy the Merchant ID, Salt Key and Salt Index required for integration.
Paytm API Keys
- Go to Paytm Business Dashboard.
- Sign in and navigate to API Keys / Developer Settings.
- Copy the Merchant ID (MID) and Merchant Key for sandbox or production use.
PayU API Keys
- Go to PayU Dashboard.
- Sign in and navigate to Settings → API Keys / Integration.
- Copy the Merchant Key and Merchant Salt required for transactions.
Ensuring proper configuration of payment gateways is crucial for secure and hassle-free transactions. Admins can enable or disable specific payment methods based on business needs.
Store Setting
Store settings overview
The Store Setting section allows admins to configure basic store details, ensuring a professional brand identity.
Store Setting
- Store Name – Set the official name of the store.
- Contact Information – Add customer support phone number and email.
- Logo – Upload a store logo for branding.
- Address – Enter the store's physical location.
-
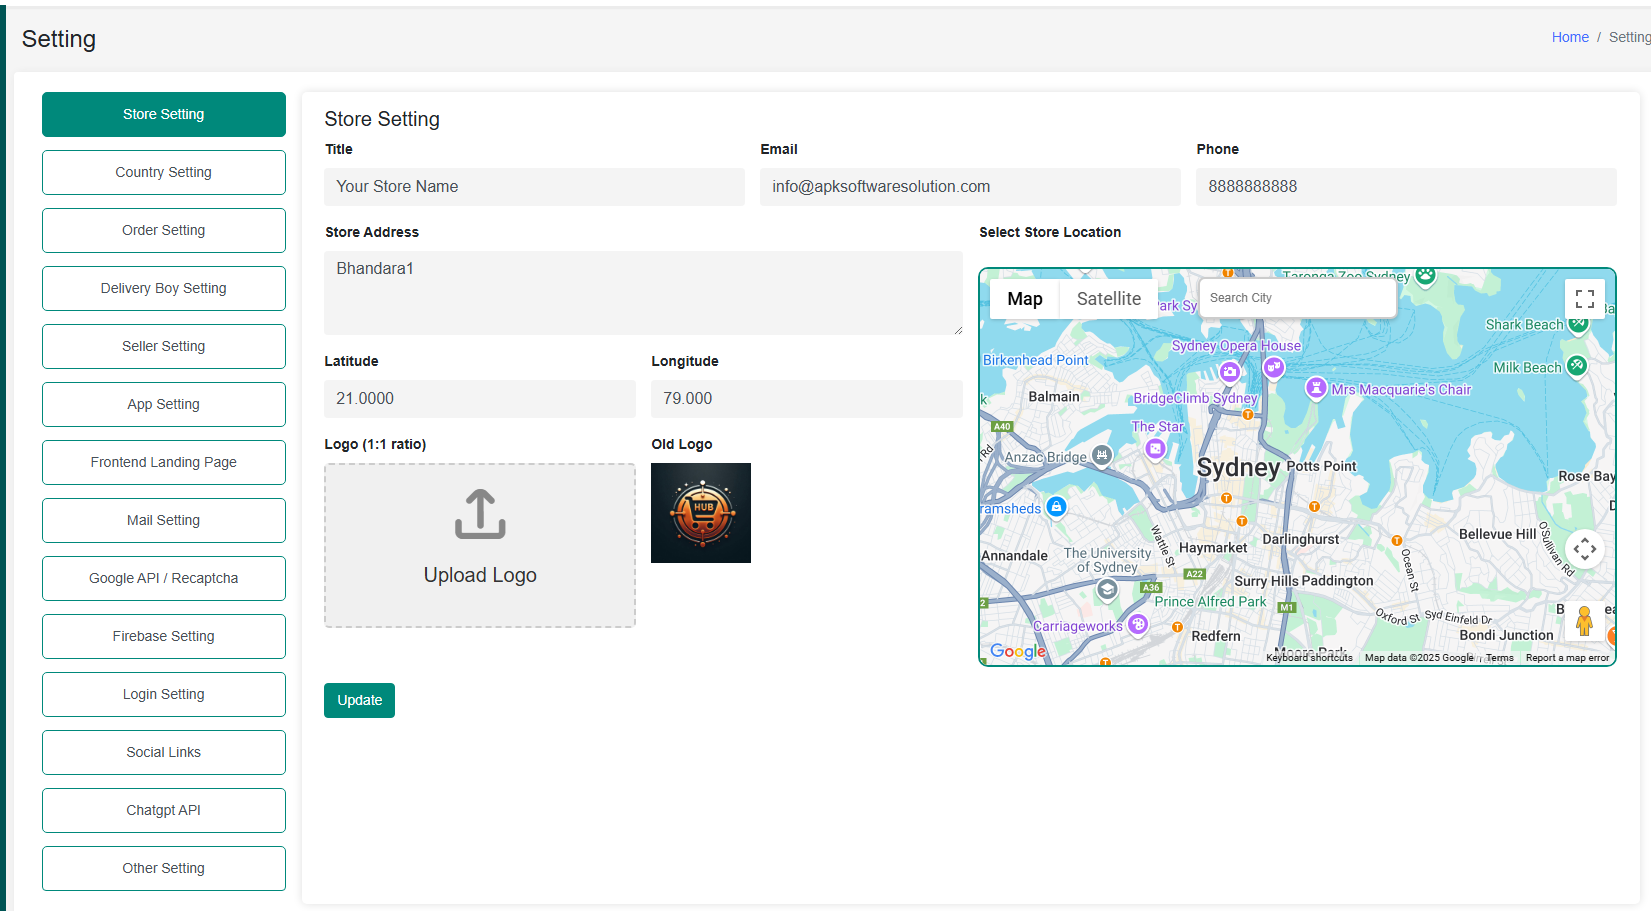
How to Configure:
- Navigate to Admin Panel → Settings → Store Settings.
- Fill in the store details and upload the logo.
- Save changes to update the store profile.
Country Setting
Configure country-specific settings such as mobile country code, currency, and timezone.
The Country Setting section allows admins to define region-based configurations to ensure proper localization.
Country Setting
- Mobile Country Code – Defines the default country code for phone numbers.
- Currency – Sets the default currency for transactions.
- Timezone – Configures the timezone for order timestamps.
-
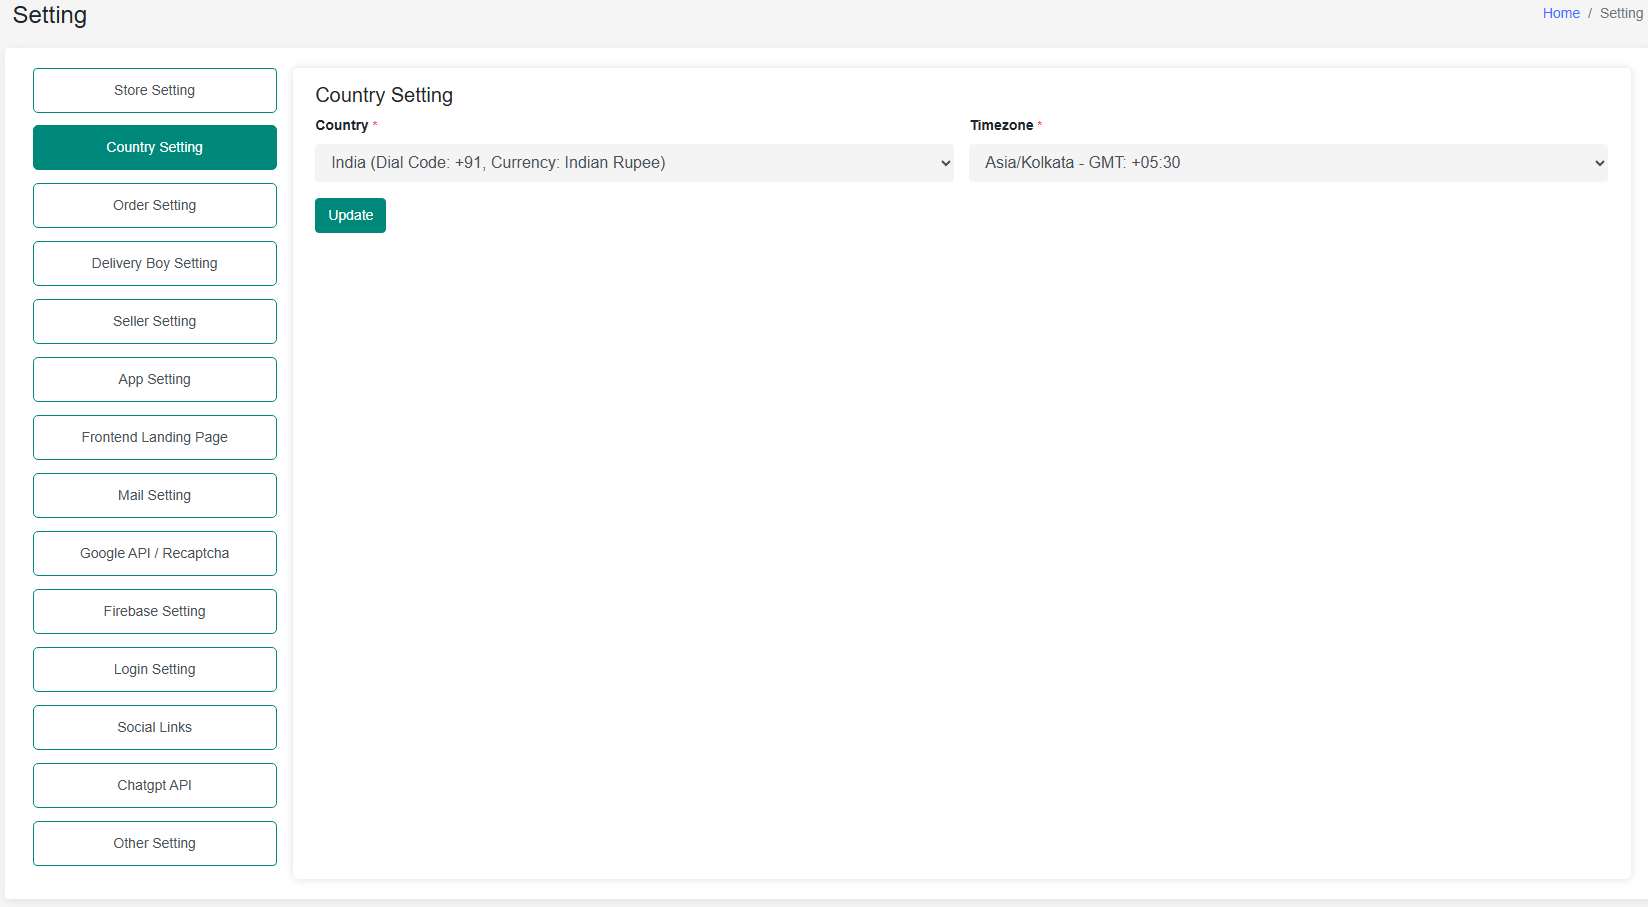
How to Configure:
- Navigate to Admin Panel → Settings → Country Settings.
- Select the preferred country code, currency, and timezone.
- Save changes.
Order Setting
Configure various aspects of order processing to enhance order management and customer experience.
The Order Setting section allows admins to control different aspects of order fulfillment, including verification, minimum order limits, and delivery methods.
Order Setting
- Order Delivery Verification – Displays a 4-digit OTP in the user app for verifying deliveries.
- Minimum Order Amount – Set a minimum cart value required for order placement.
- Additional Charges – Manage extra fees such as packaging or service charges.
- Delivery Method Control – Configure options for Home Delivery, Scheduled Delivery, and Self Pickup.
-
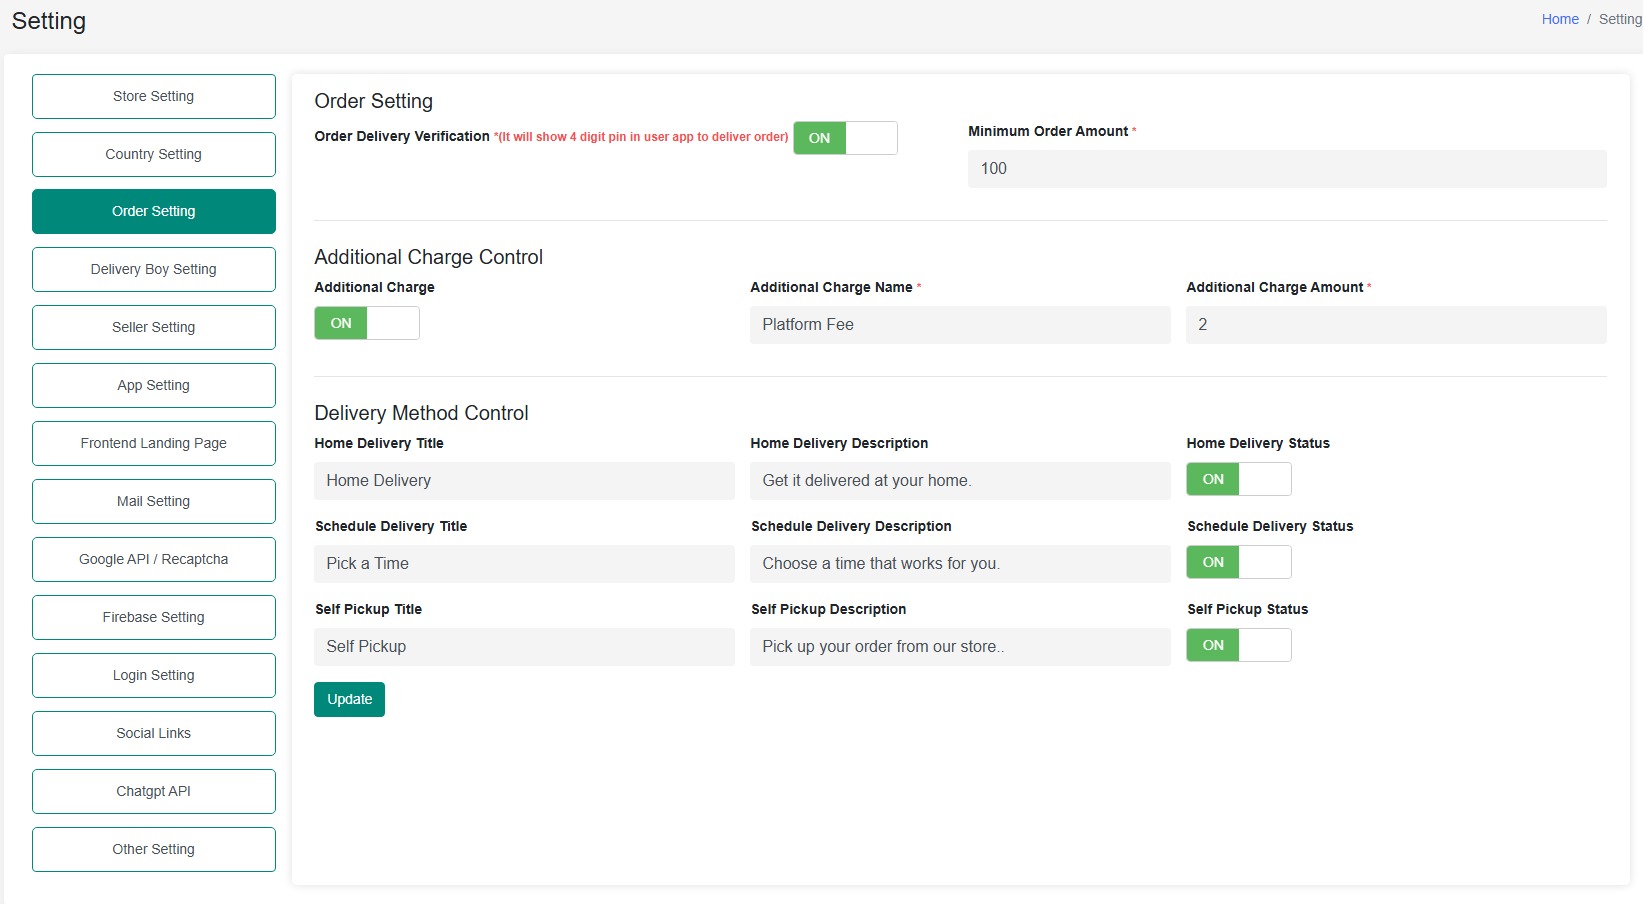
How to Configure:
- Go to Admin Panel → Settings → Order Settings.
- Enable/disable features and set values accordingly.
- Save settings for the changes to take effect.
Delivery Boy Setting
Manage and configure settings related to delivery personnel, including earnings visibility, bonuses, and cash handling.
The Delivery Boy Setting section allows admins to control earnings visibility, bonuses, and cash-in-hand limits for delivery personnel.
Delivery Boy Setting
- Show Earning in App – Allows delivery agents to see earnings per order.
- Bonus Settings – Configure incentive bonuses.
- Cash in Hand – Set the maximum cash a delivery agent can hold.
-
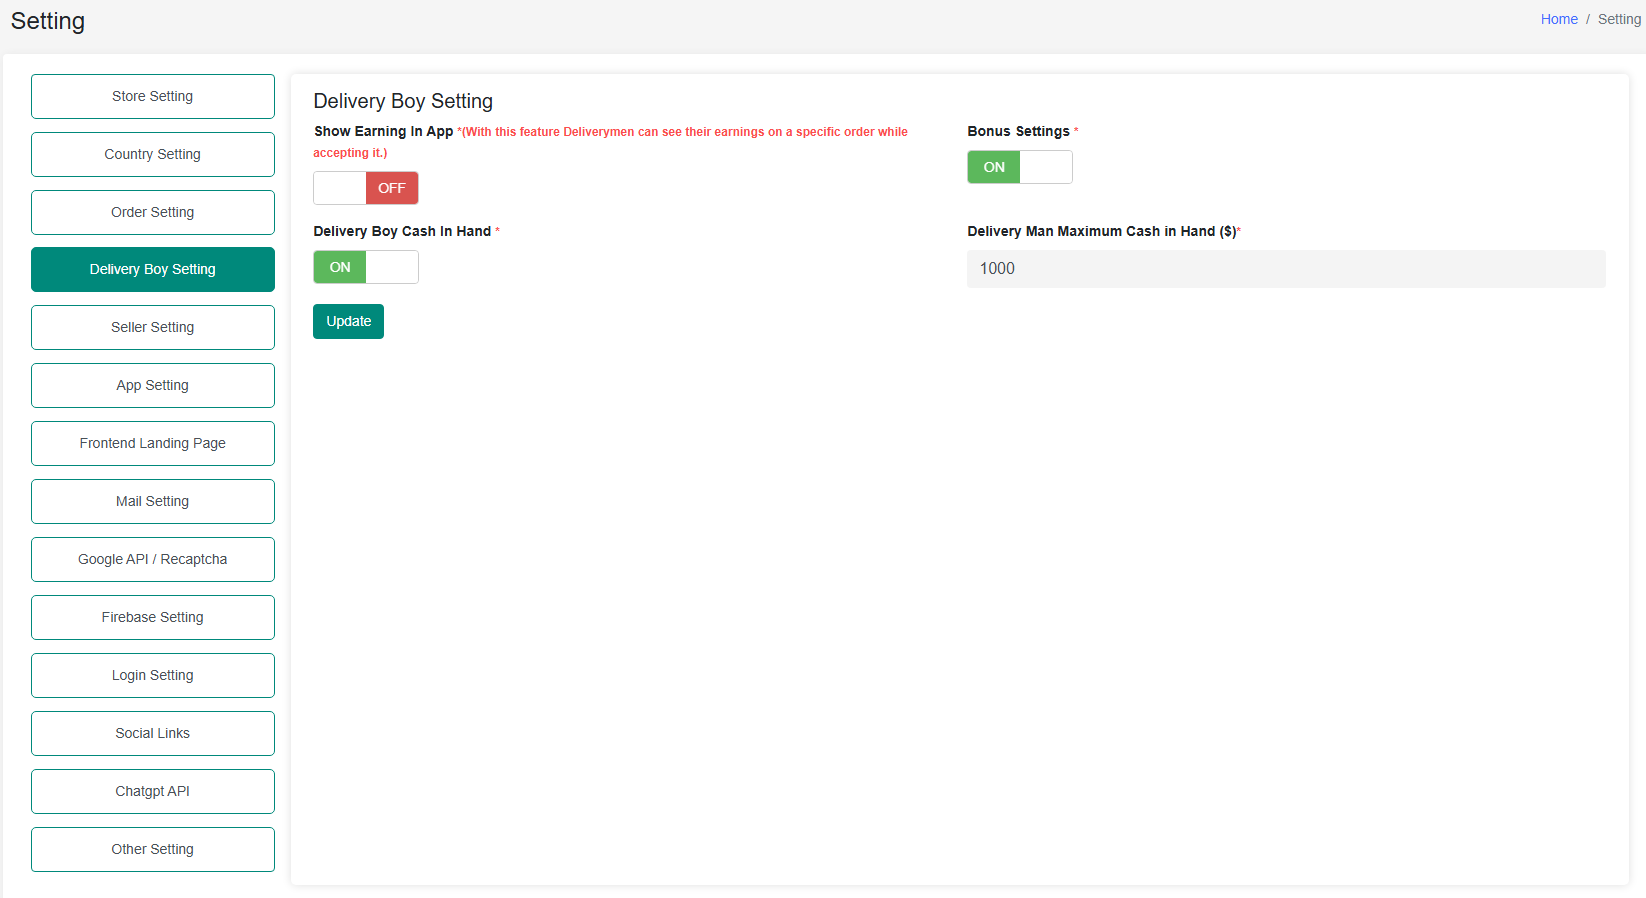
How to Configure:
- Navigate to Admin Panel → Settings → Delivery Boy Settings.
- Enable/disable the necessary options and set limits.
- Save the settings.
Seller Setting
Manage seller permissions and interactions with orders, carts, and product publishing.
The Seller Setting section allows admins to configure seller permissions, including order processing, cart functionality, and product publishing approval.
Seller Setting
- Order Cancellation & Completion – Decide if sellers can cancel or complete orders.
- One Seller Cart – Allows multiple products from the same seller in one cart.
- Product Publishing Approval – Require admin approval before publishing new products.
-
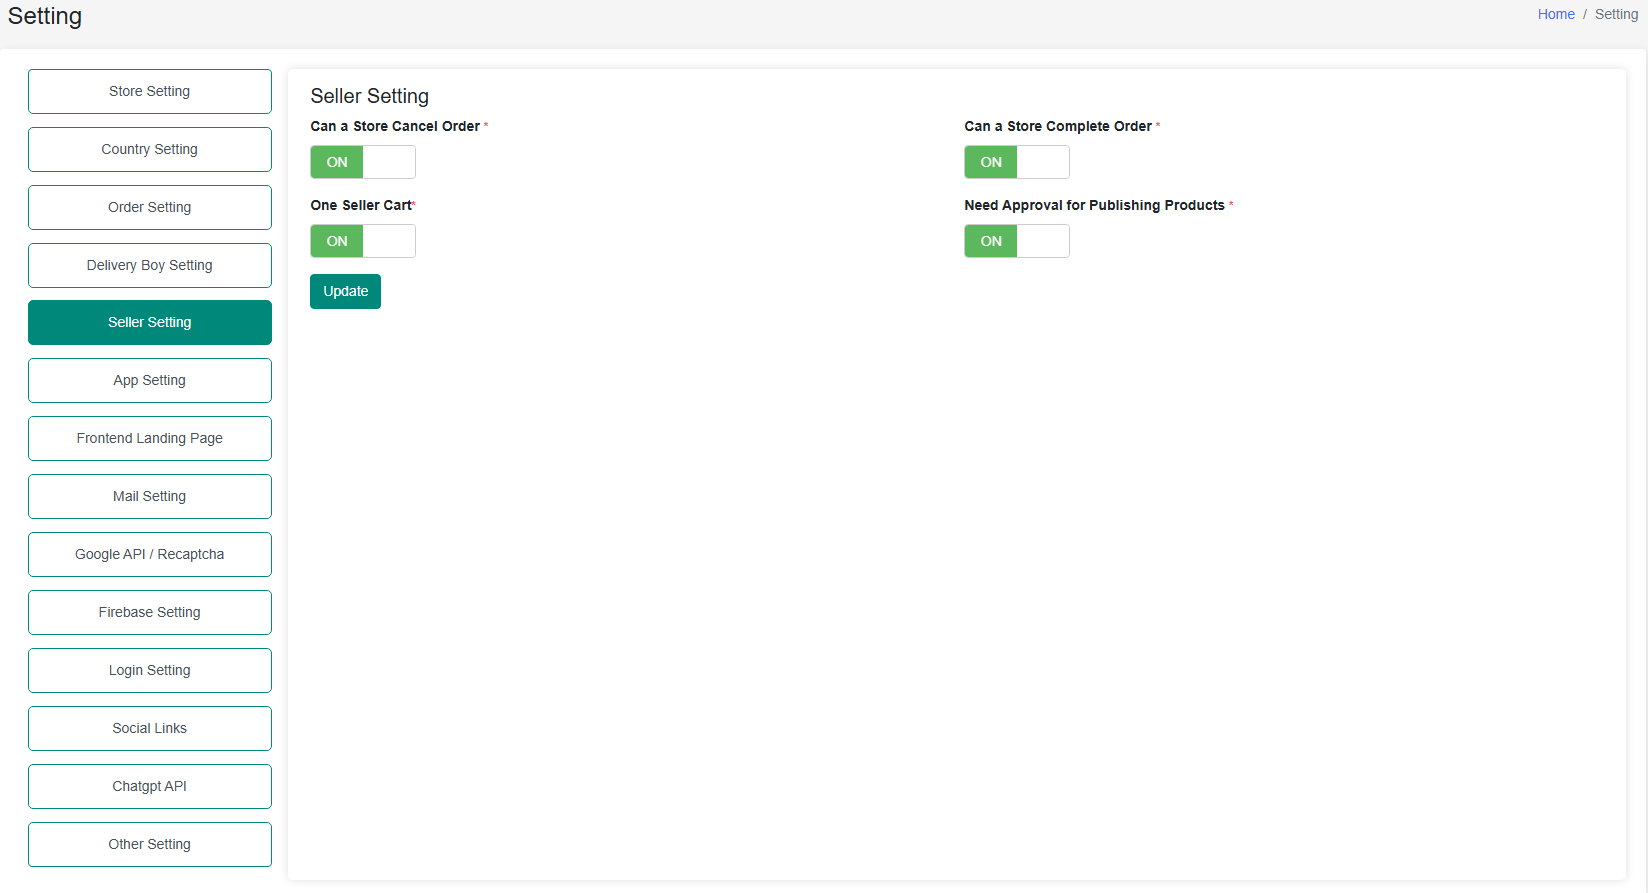
How to Configure:
- Navigate to Admin Panel → Settings → Seller Settings.
- Toggle settings as per store policies.
- Save changes.
Mail Setting (SMTP Configuration)
Configure SMTP settings for outgoing emails to ensure reliable email delivery.
The Mail Setting section allows admins to configure SMTP settings for sending transactional and notification emails from the system.
Mail Setting (SMTP Configuration)
- Mailer Name – Sender name appearing in emails.
- Host – SMTP server address (e.g., smtp.gmail.com).
- Email ID & Password – Email login credentials.
- Port & Encryption – Defines security protocols (e.g., TLS, SSL).
-
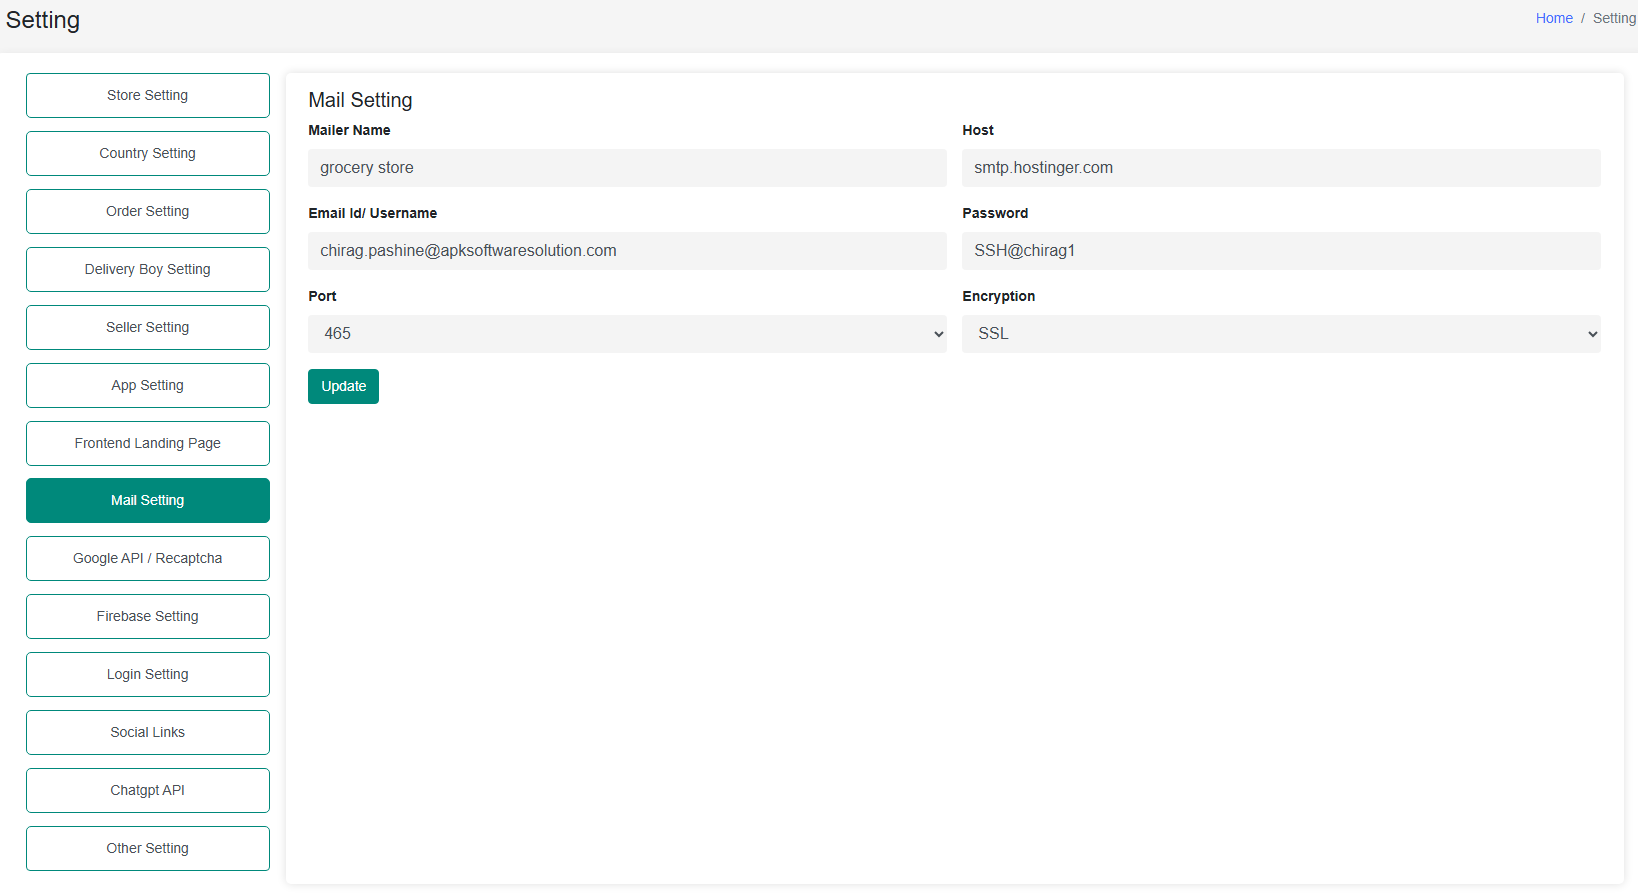
How to Configure SMTP :
- Go to Admin Panel → Settings → Mail Settings.
- Enter SMTP details:
- Host: Yoursmtpmailserver
- Port: 587 (TLS) or 465 (SSL)
- Encryption: TLS or SSL
- Email & Password: Your credentials
- Save the configuration.
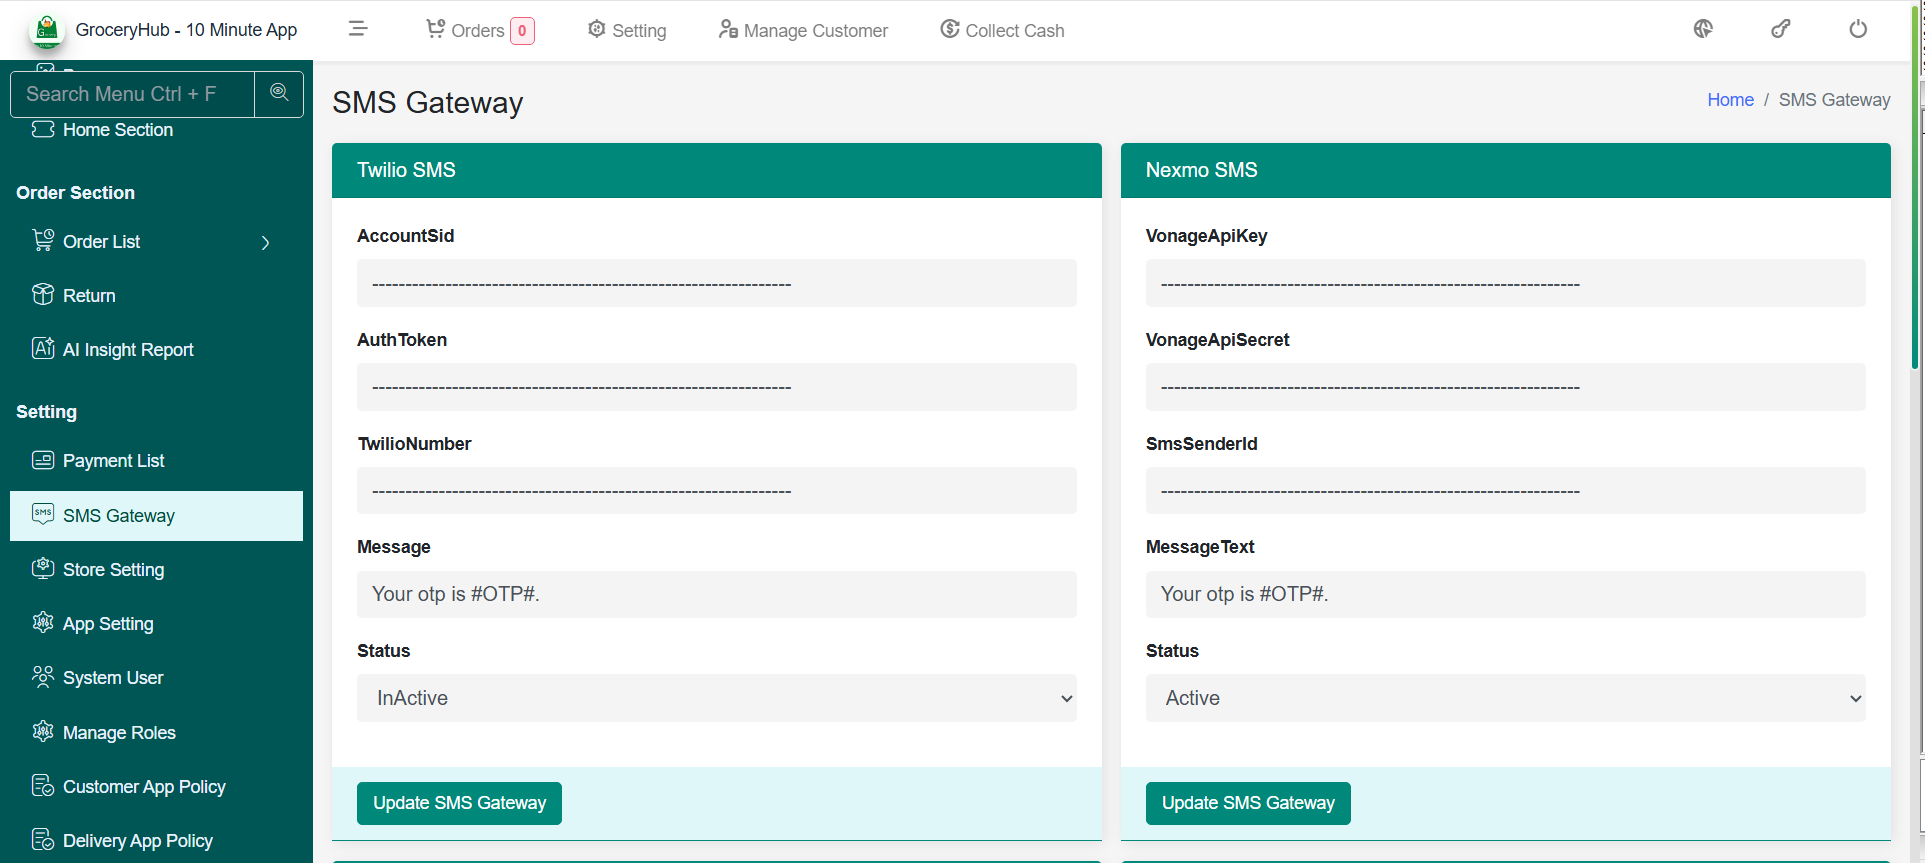
SMS OTP Setting (SMS Gateway Configuration)
Configure SMS gateway settings to enable OTP-based user authentication and notifications.
The SMS OTP Setting section allows admins to configure various SMS gateways like Nexmo, Fast2SMS, NSG1, 2Factor, and Twilio to send OTPs for authentication and alerts.
Supported SMS Gateways
- Nexmo (Vonage) – API-based gateway for international messaging.
- Fast2SMS – Popular in India with promotional and transactional SMS support.
- MSG91 – Bulk SMS provider with API access.
- 2Factor – DLT-approved provider for OTP SMS in India.
- Twilio – Global SMS provider with robust API and security.
How to Configure SMS OTP :
- Go to Admin Panel → SMS Gateway.
- Choose your preferred SMS gateway.
- Enter API credentials:
- API Key / SID / Auth Token – As provided by the SMS provider.
- Sender ID – Required for some providers like Nexmo.
- Save the configuration.
Firebase Setting
Configure Firebase settings to enable push notifications and real-time updates.
The Firebase Setting section allows admins to integrate Firebase services for real-time updates and push notifications.
Firebase Setting
- API Key – Used to authenticate Firebase services.
- Auth Domain – Specifies the authentication domain.
- Storage Bucket – Stores files such as images and documents.
- Messaging Sender ID – Enables push notifications.
- JSON Service File Content – Contains Firebase credentials.
-
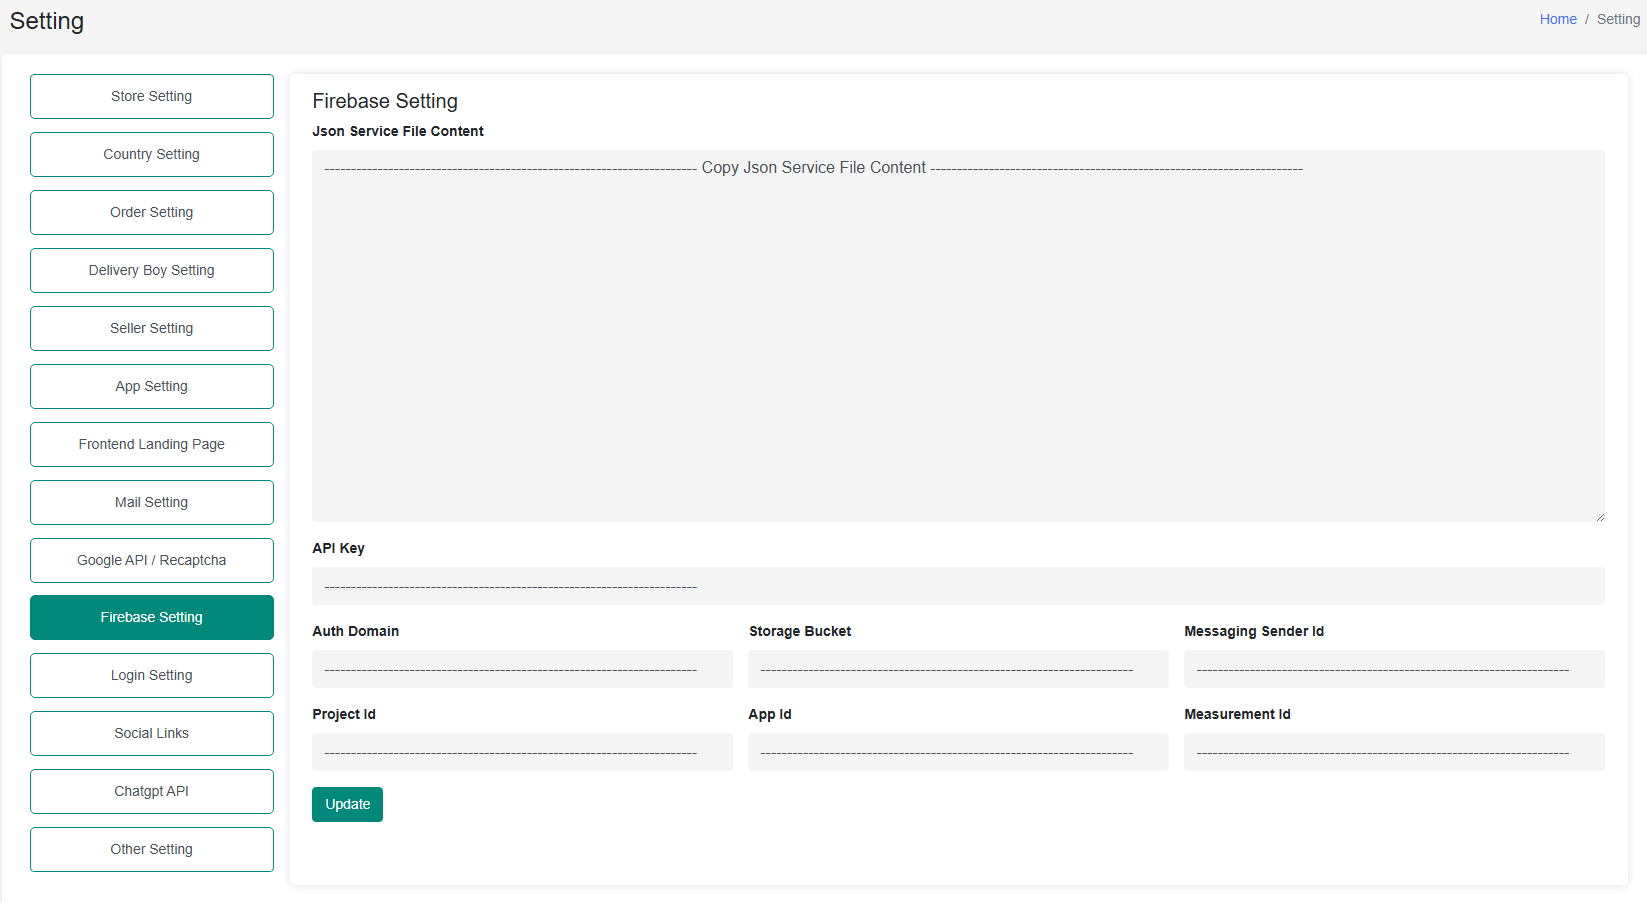
How to Configure Firebase:
- Visit Firebase Console.
- Create a new project and enable Cloud Messaging.
- Navigate to Project Settings → Service Accounts.
- Download the JSON file and upload it to the admin panel.
Firebase OTP System (Enable / Disable)
The Firebase OTP System lets admins turn phone-number OTP verification on or off directly from the admin panel. When enabled, users receive a One-Time Password (OTP) through Firebase Phone Authentication to verify their mobile number during login or registration. When disabled, the platform falls back to the configured SMS gateway (or skips OTP verification, depending on your setup).- Firebase OTP – ON – OTP verification is handled by Firebase Phone Authentication. Ensure Phone sign-in is enabled in Firebase Console → Authentication → Sign-in method and that valid Firebase credentials are configured above.
- Firebase OTP – OFF – Firebase OTP is bypassed and OTP delivery relies on the configured SMS OTP Setting (e.g. Twilio, Nexmo, Fast2SMS) or is skipped entirely.
How to Enable / Disable Firebase OTP:
- Go to Admin Panel → Firebase Setting.
- Locate the Firebase OTP System toggle.
- Switch the toggle ON to activate Firebase OTP verification, or OFF to disable it.
- Make sure the Firebase API Key, Auth Domain, and JSON Service File are configured before enabling OTP.
- Save the settings to apply the changes.
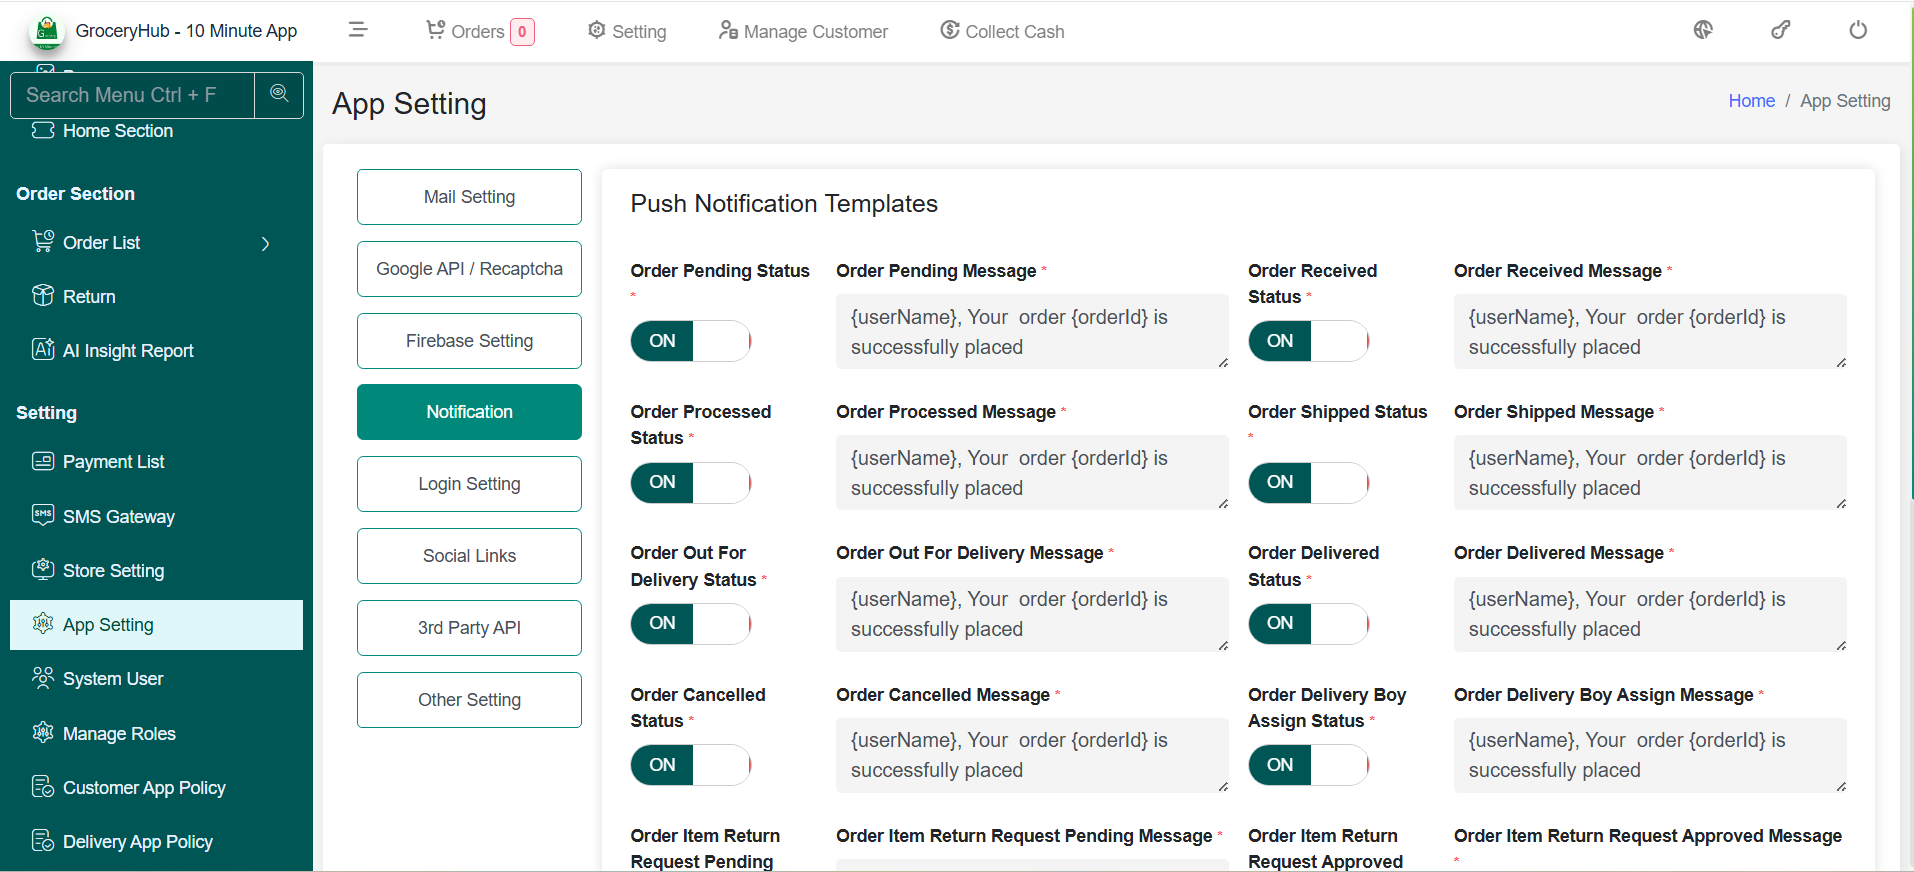
Push Notification Setting
Configure Push Notification setting to customize order status notification template.
The Push Notification Setting section allows admins to configure various notification templates for order status.
Supported SMS Gateways
- Order Pending Message
- Order Received Message
- Order Processed Message
- Order Shipped Message
- Order Out For Delivery Message
- Order Delivered Message
- Order Cancelled Message
- Order Delivery Boy Assign Message
- Order Item Return Request Pending Message
- Order Item Return Request Approved Message
- Order Item Return Request Reject Message
- Order Item Return Request Return To Deliveryboy Message
- Order Item Return Request Return To Seller Message
- Order Update Delivery Date Message
Google API / Recaptcha
Configure various Google services, including Maps, Speech-to-Text, and reCAPTCHA, to enhance security and functionality.
The Google API / Recaptcha section allows admins to integrate Google services such as location-based features, speech recognition, and spam protection.
Google API / Recaptcha
- Google Maps API – Enables location-based features.
- Google Speech-to-Text API – Converts speech into text.
- Google reCAPTCHA v3 – Protects login and registration forms from spam bots.
-
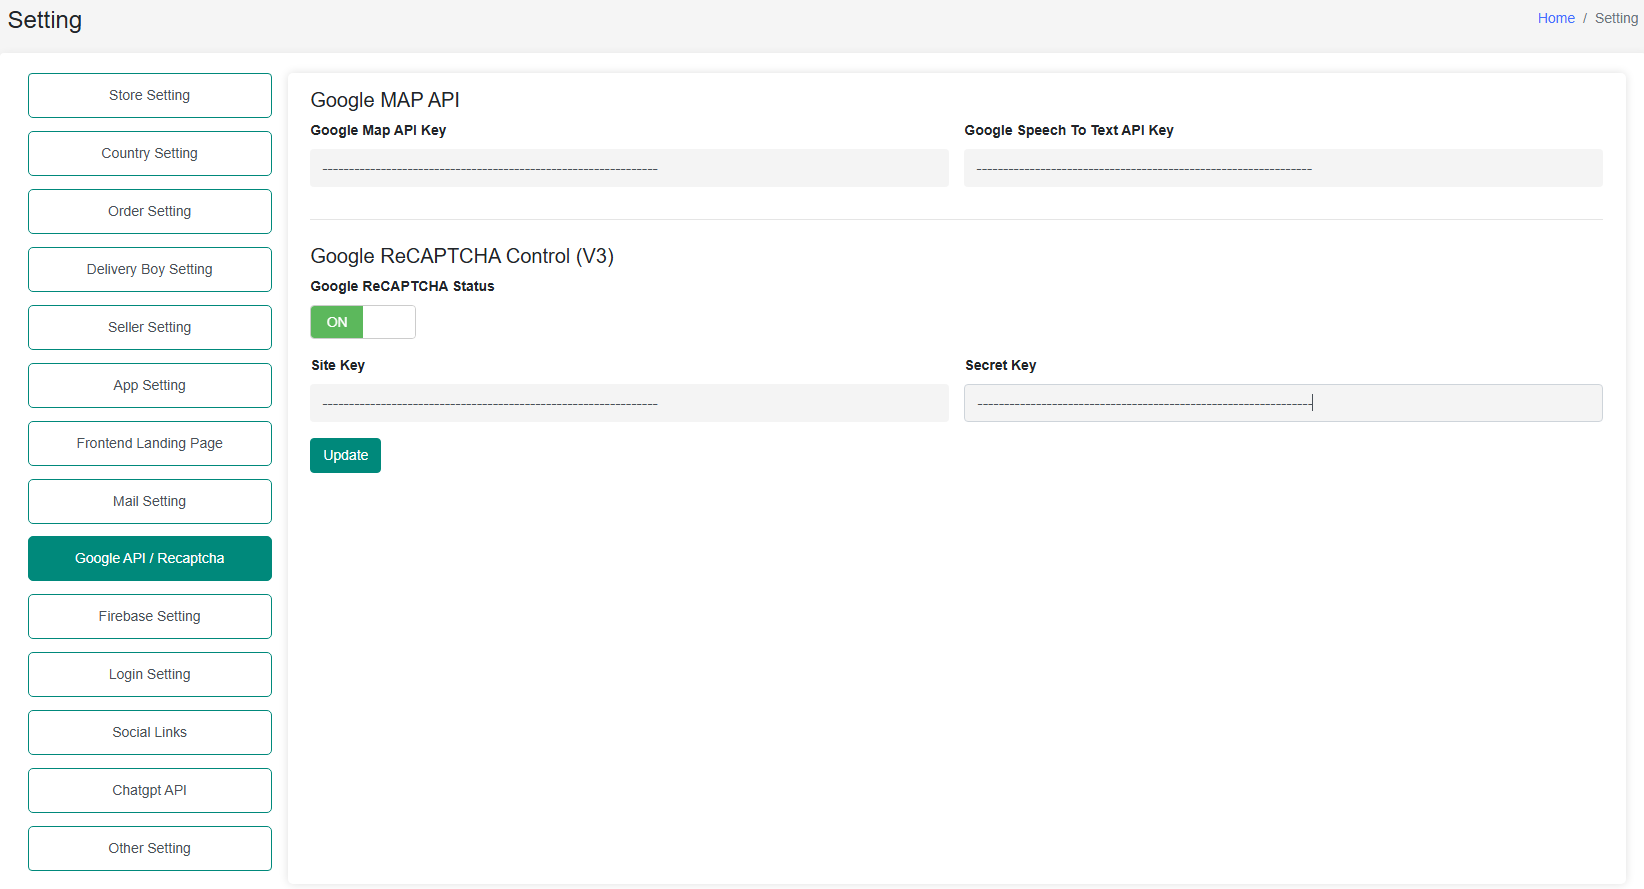
How to Get API Keys:
- Go to Google Cloud Console.
- Create a new project and enable the necessary APIs.
- Generate API keys under APIs & Services → Credentials.
- Copy and paste the keys into the admin panel settings.
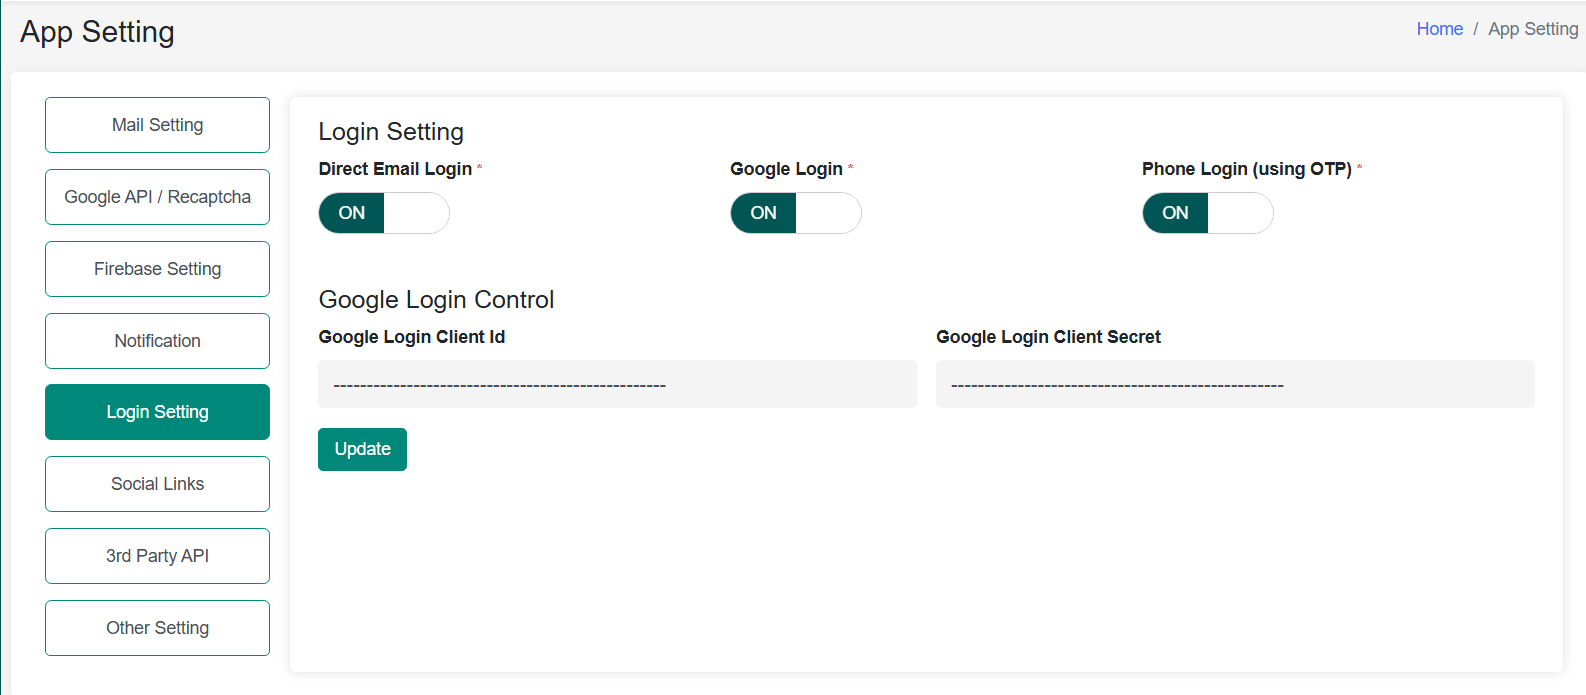
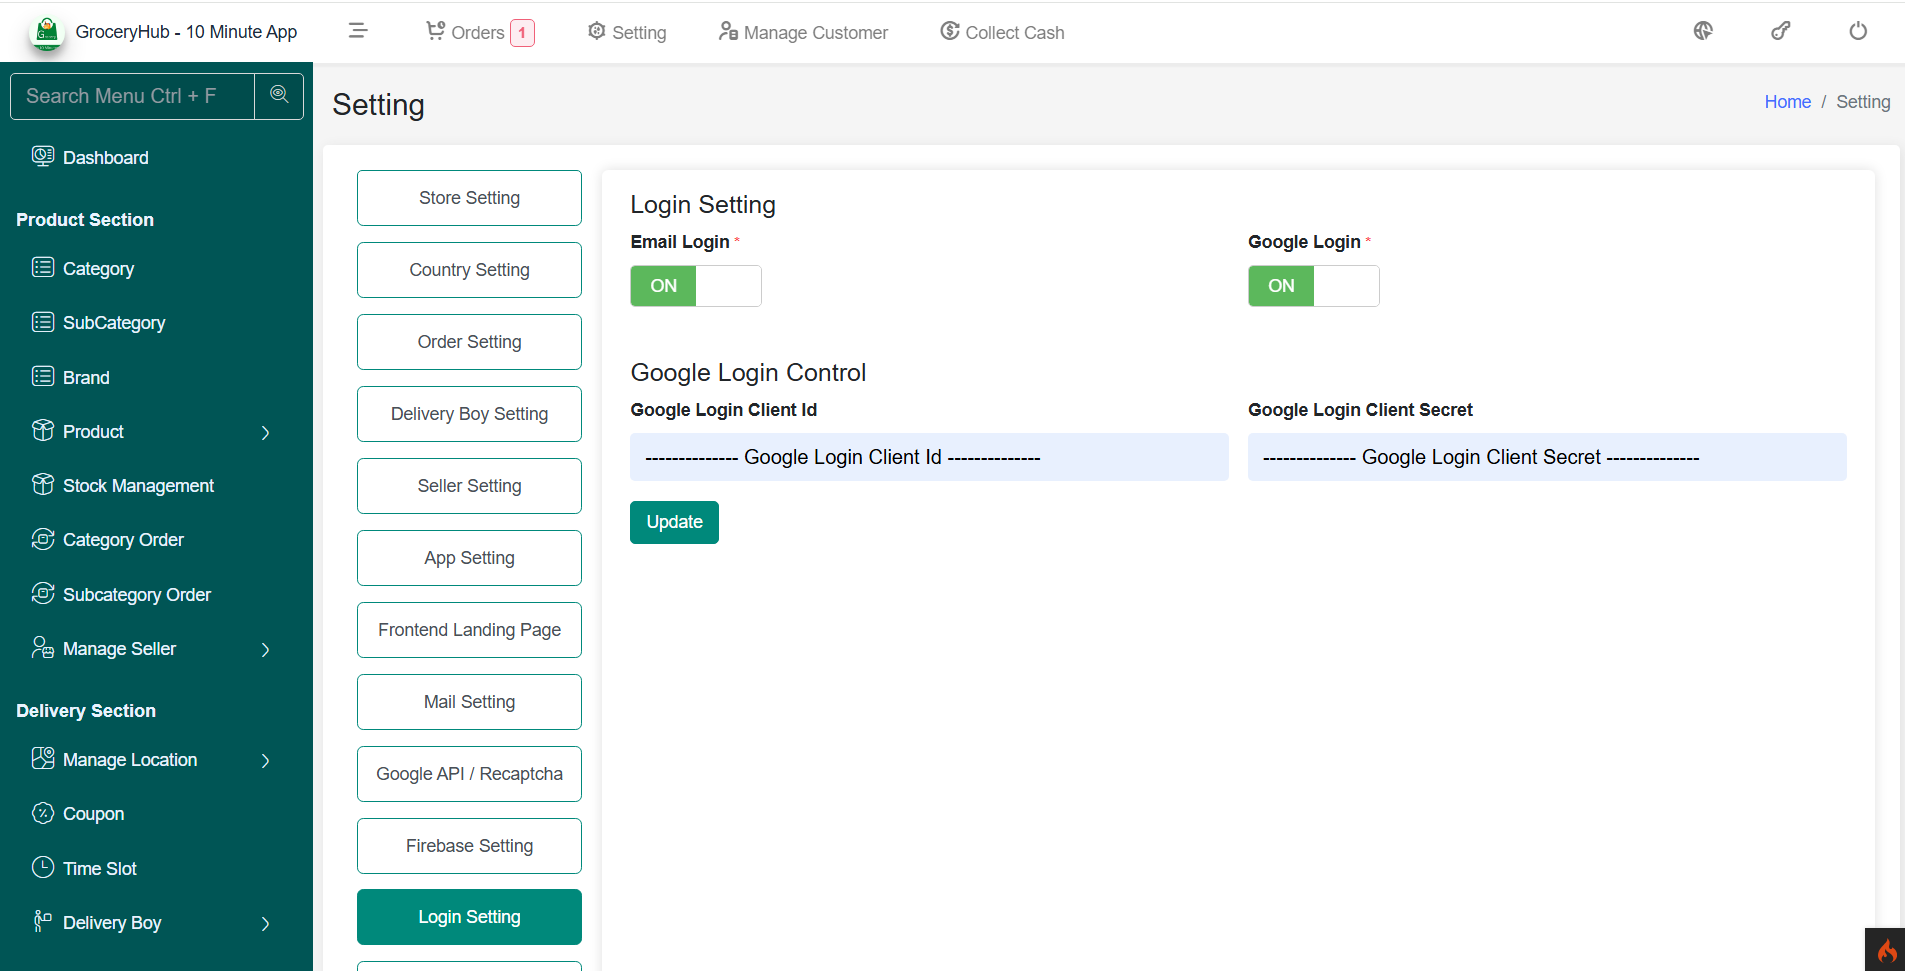
Login Setting
Configure authentication methods for users.
The Login Setting section allows admins to manage authentication methods, providing flexibility for users to log in via email or Google authentication.
Login Setting
- Email Login – Allows users to log in using email and password.
- Google Sign-In – Enables Google-based authentication.
- Phone LogIn using OTP – Enables OTP-based authentication.
-
How to Enable Google Sign-In:
-
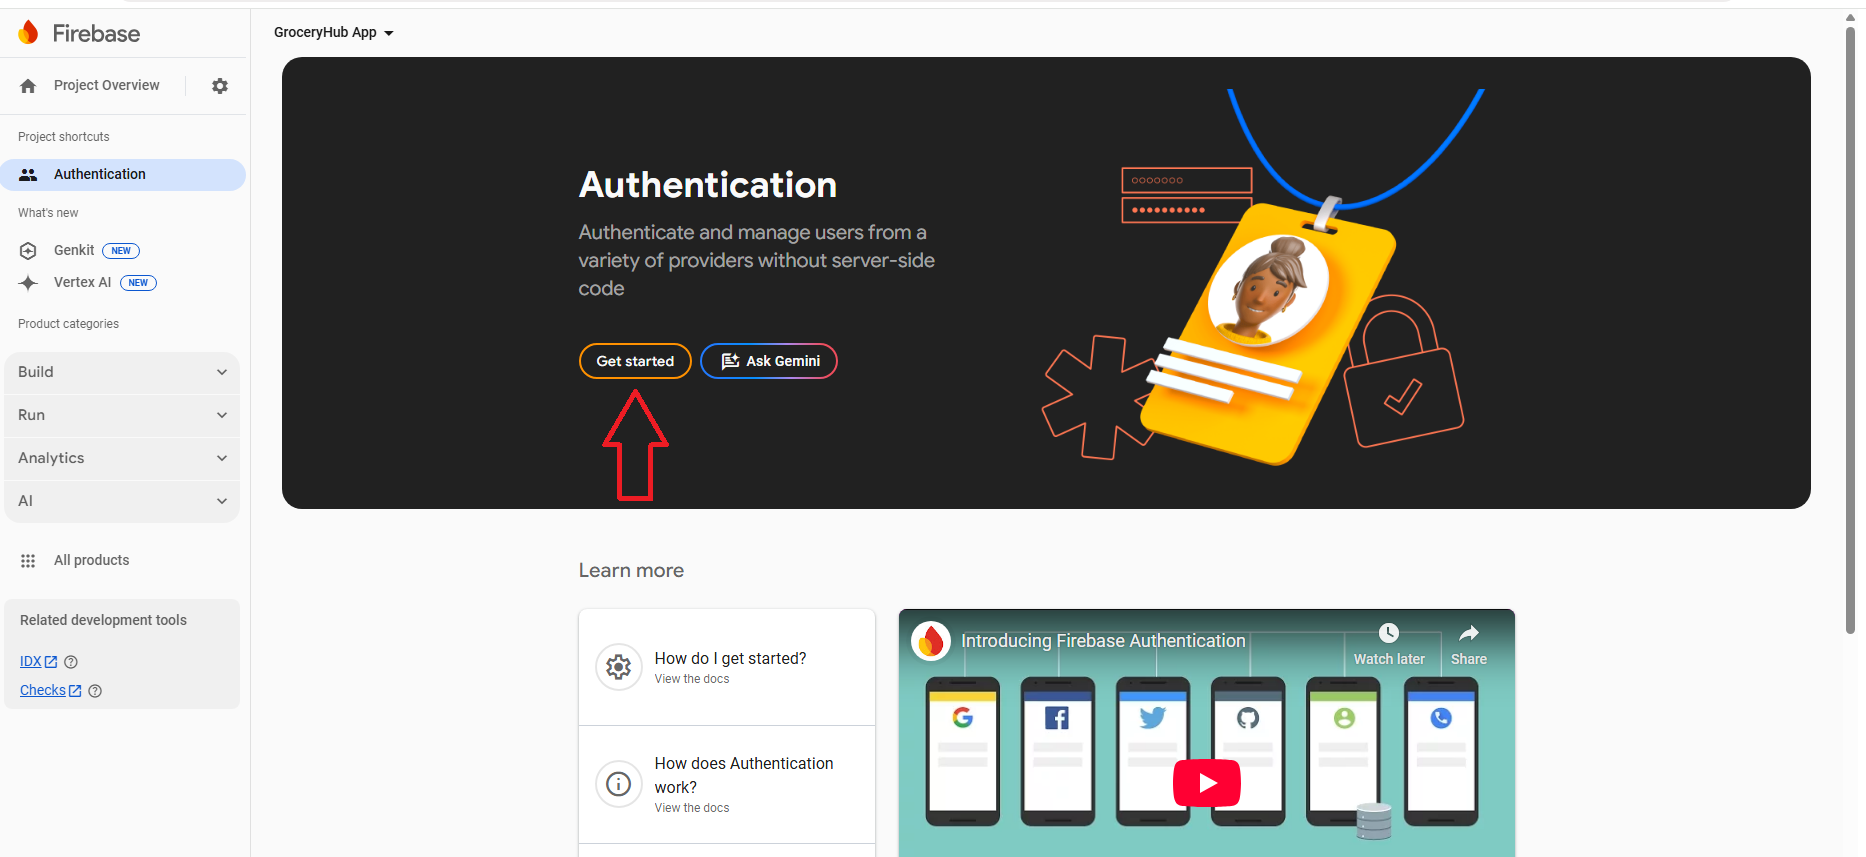
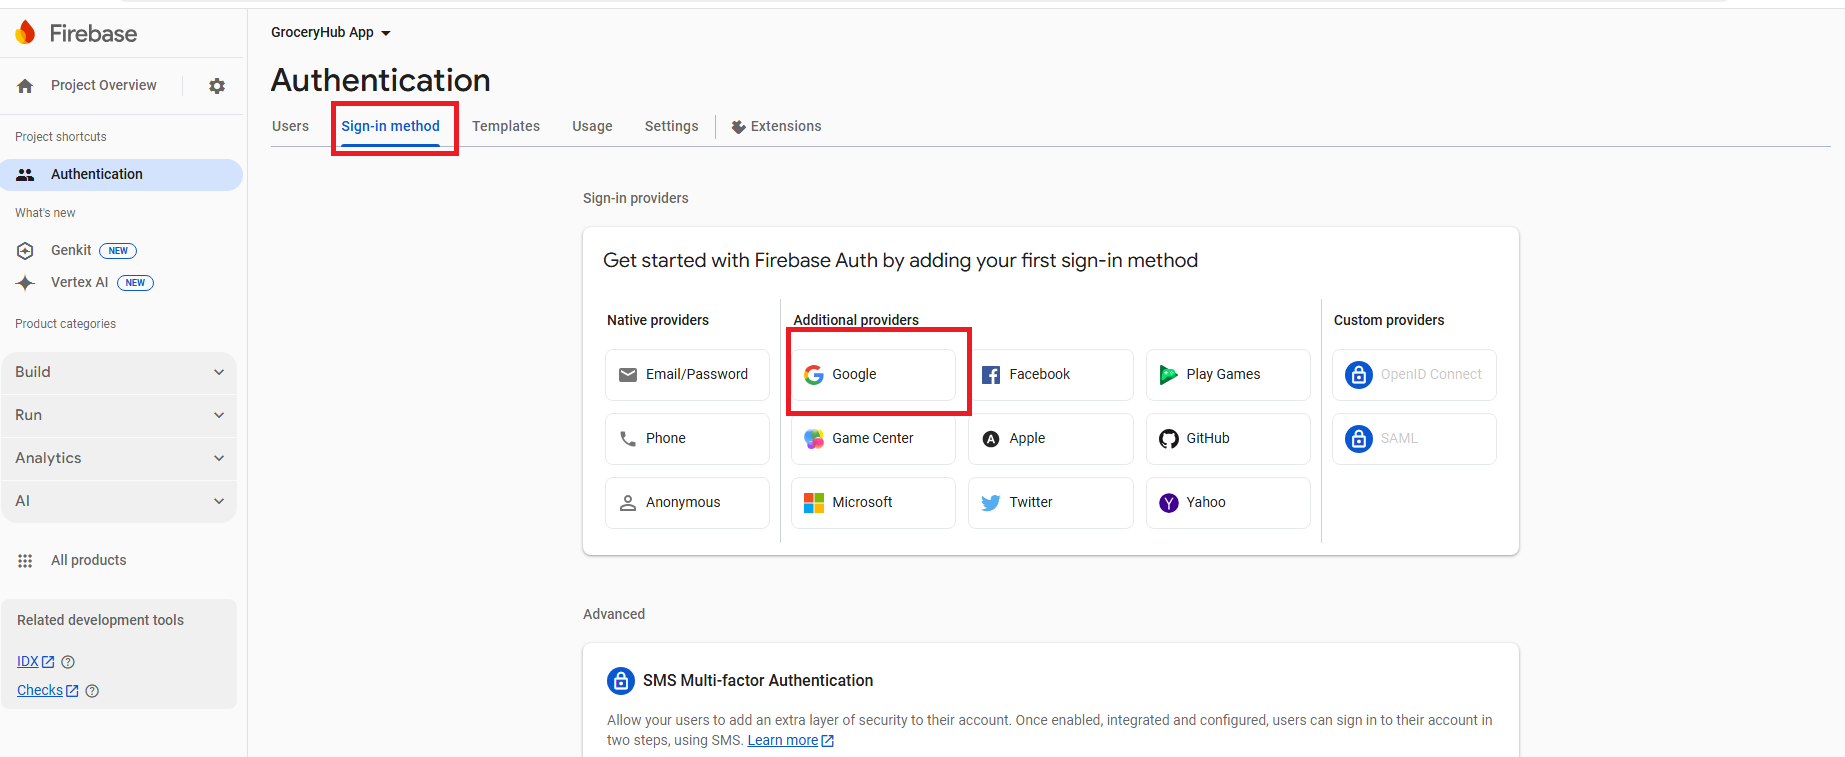
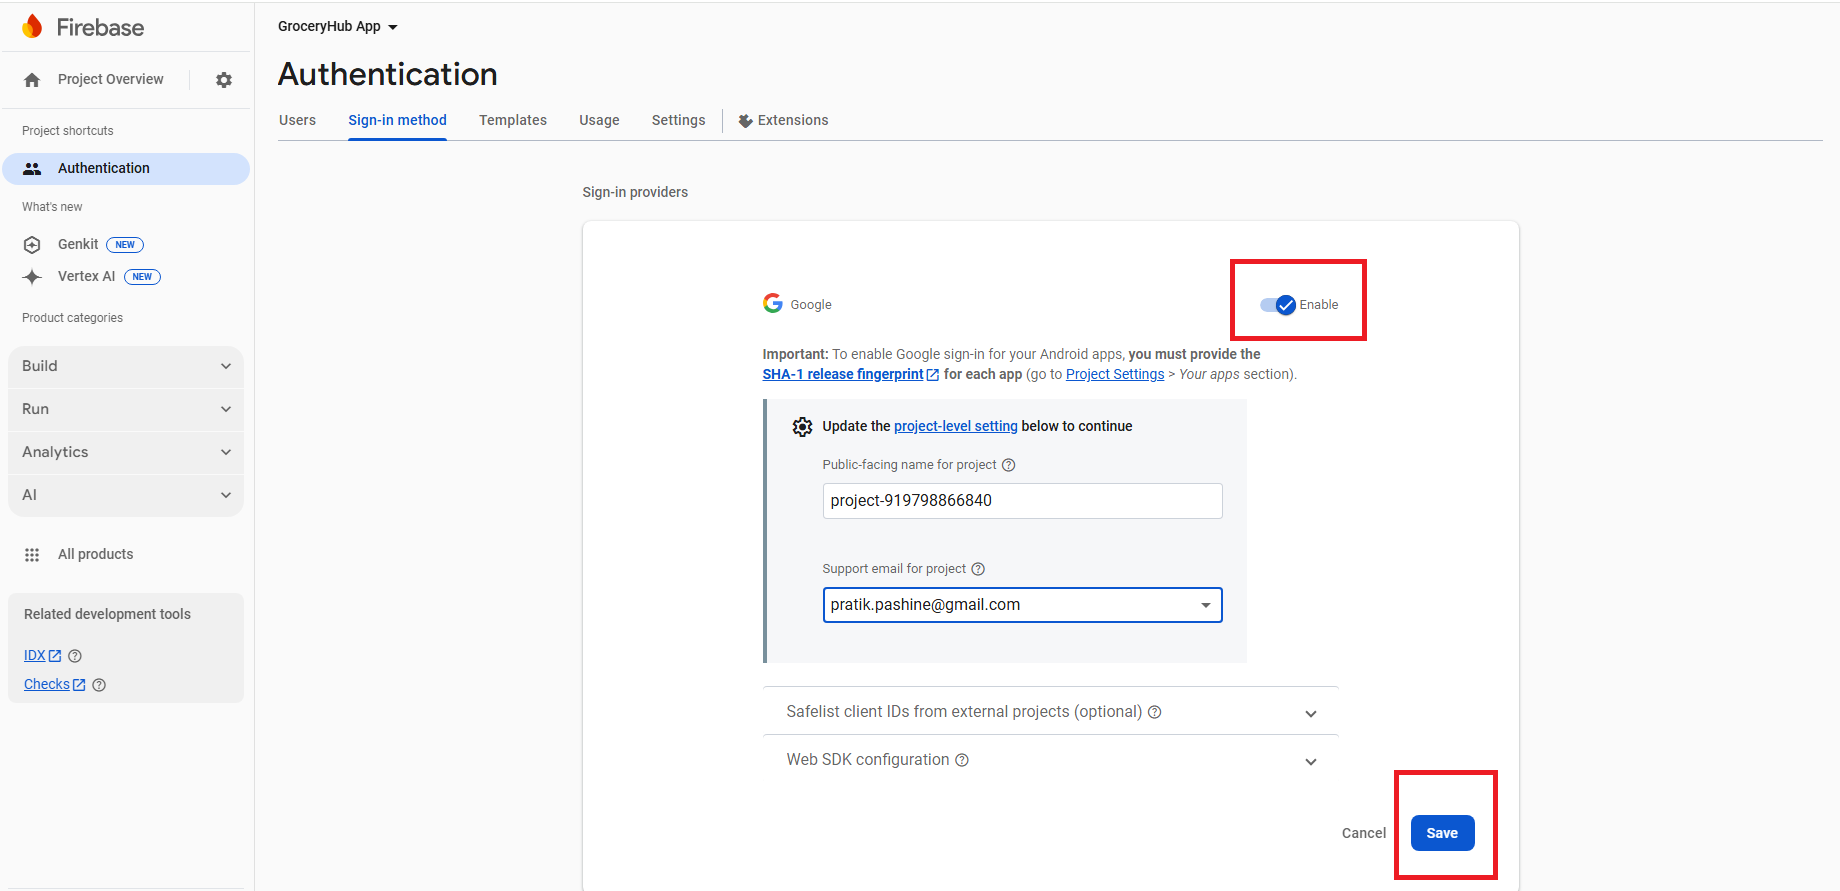
Step 1: Enable Google Sign-In in Firebase:
- Go to **Firebase Console > Authentication > Sign-in method**.
- Enable **Google** and provide a valid support email.
-
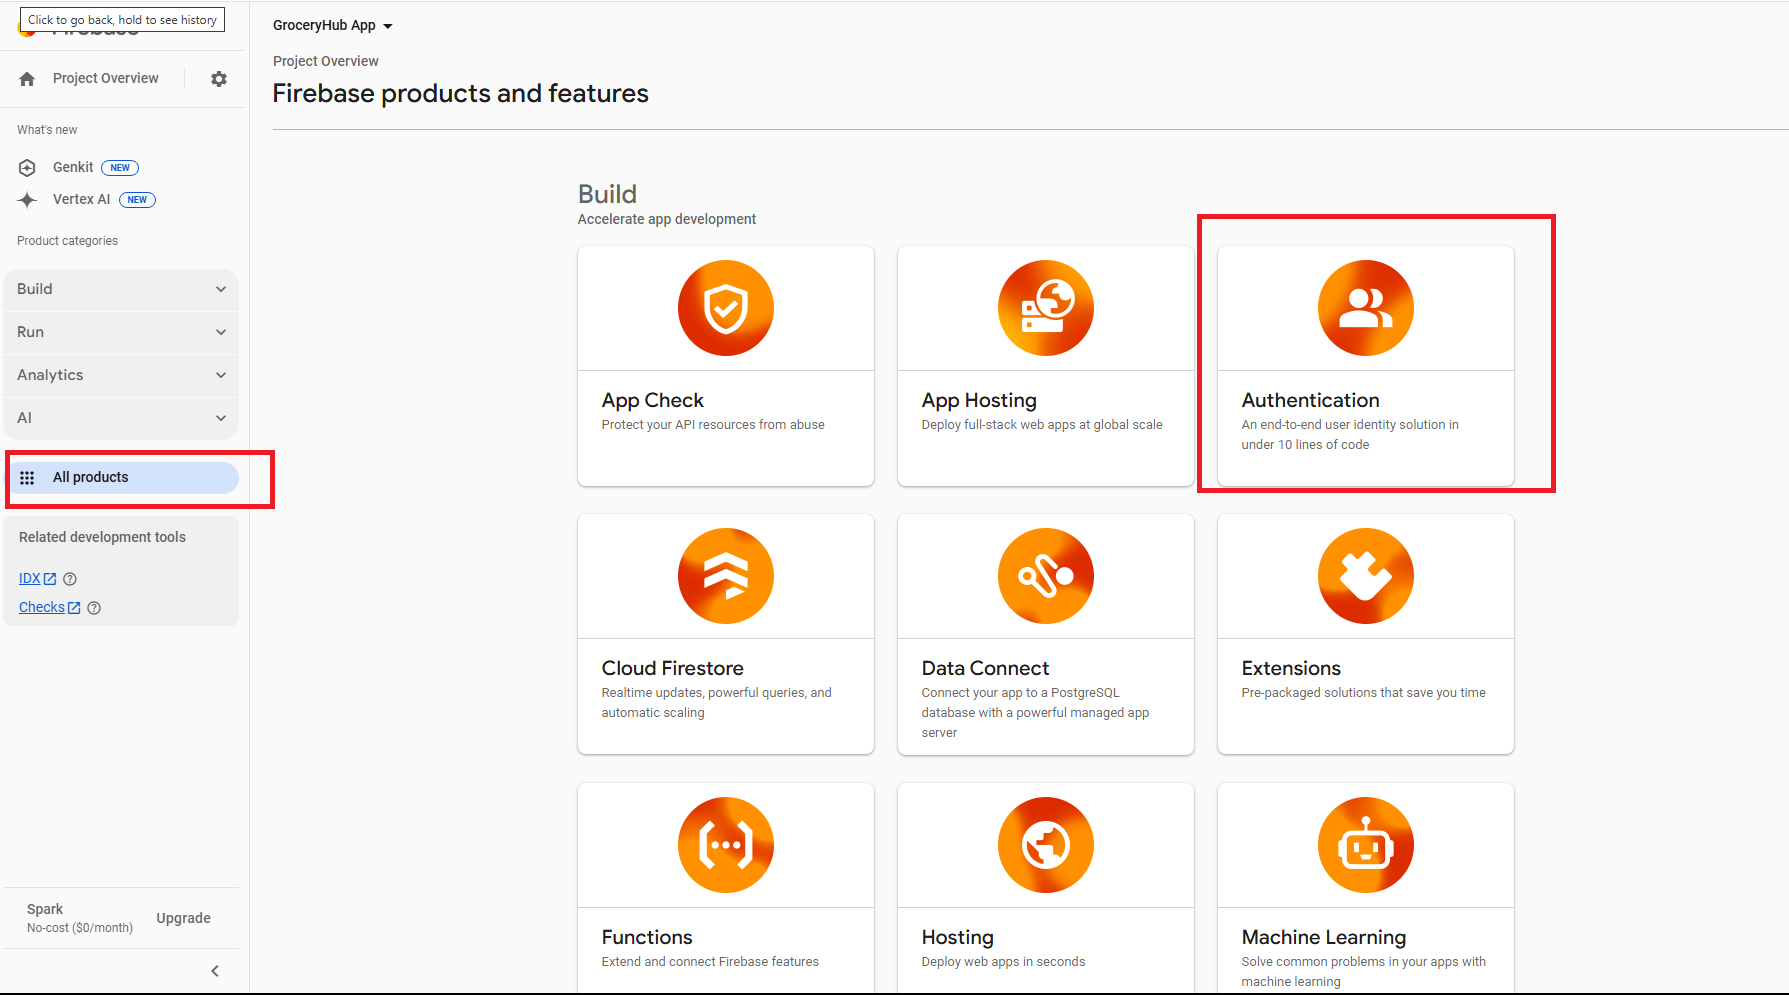
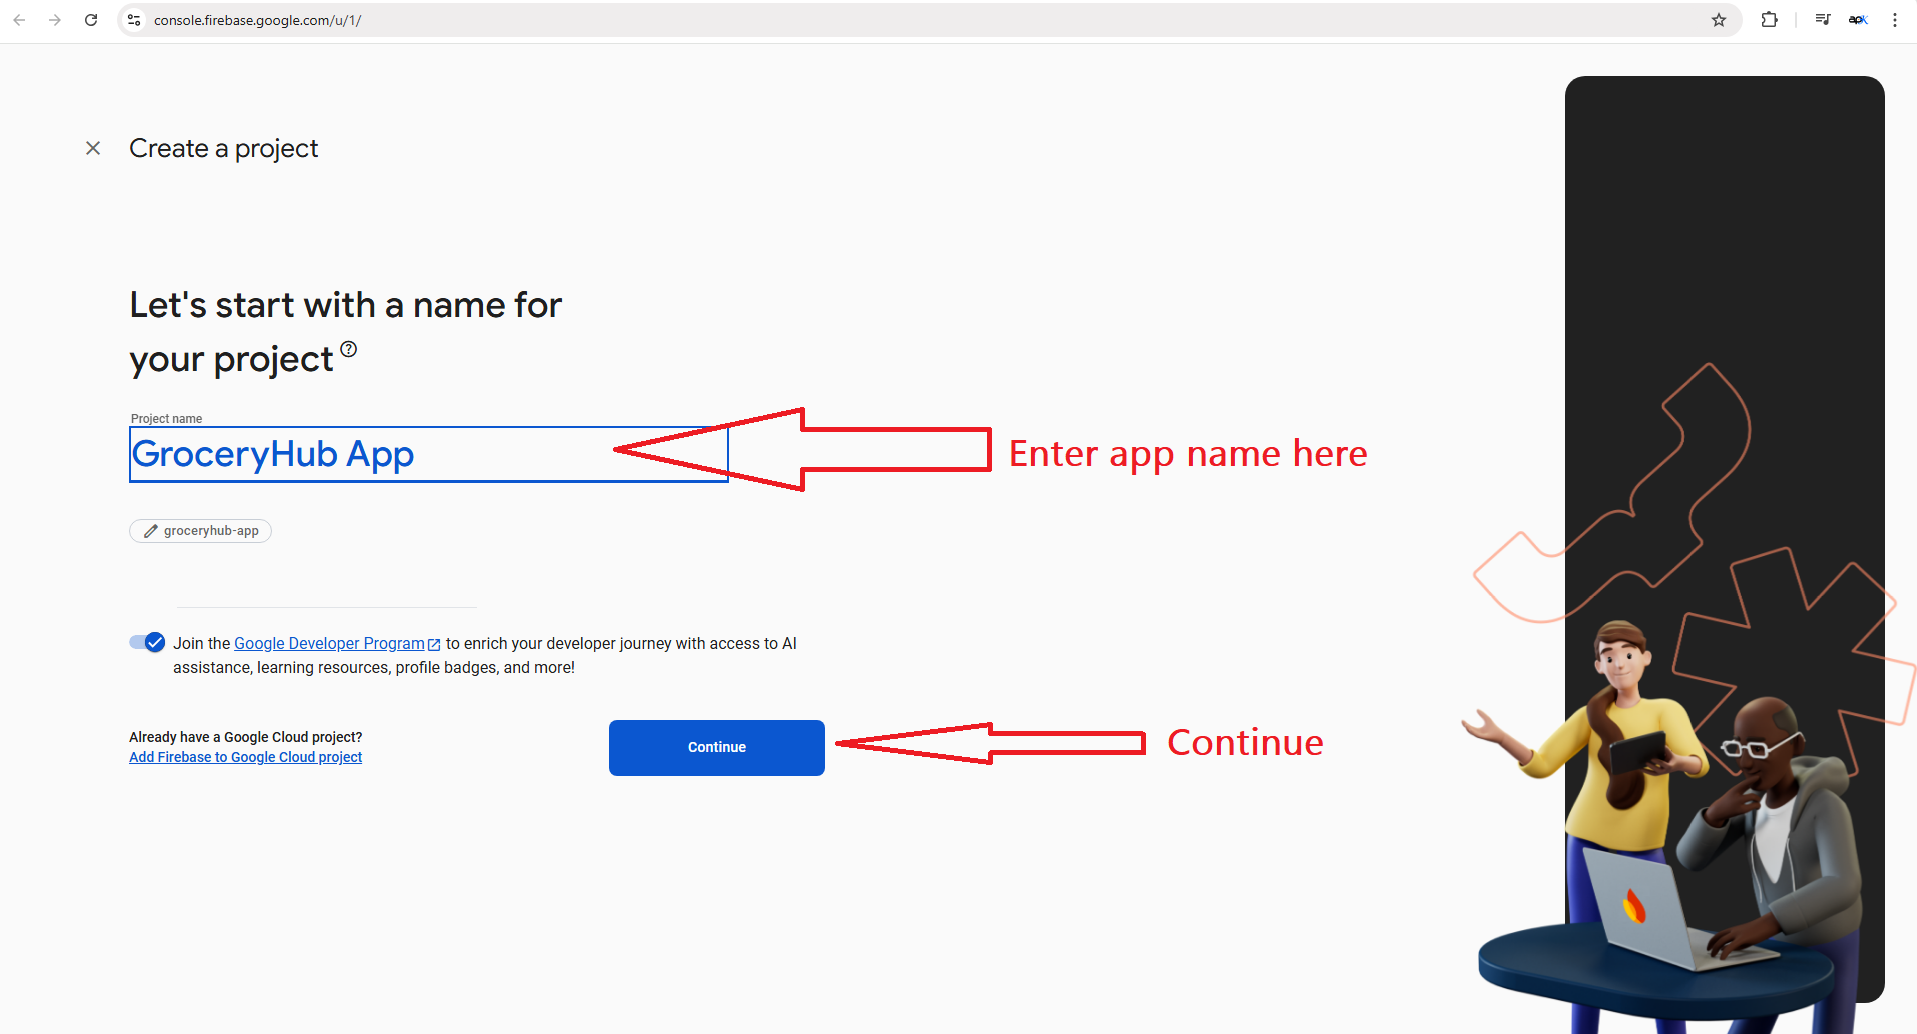
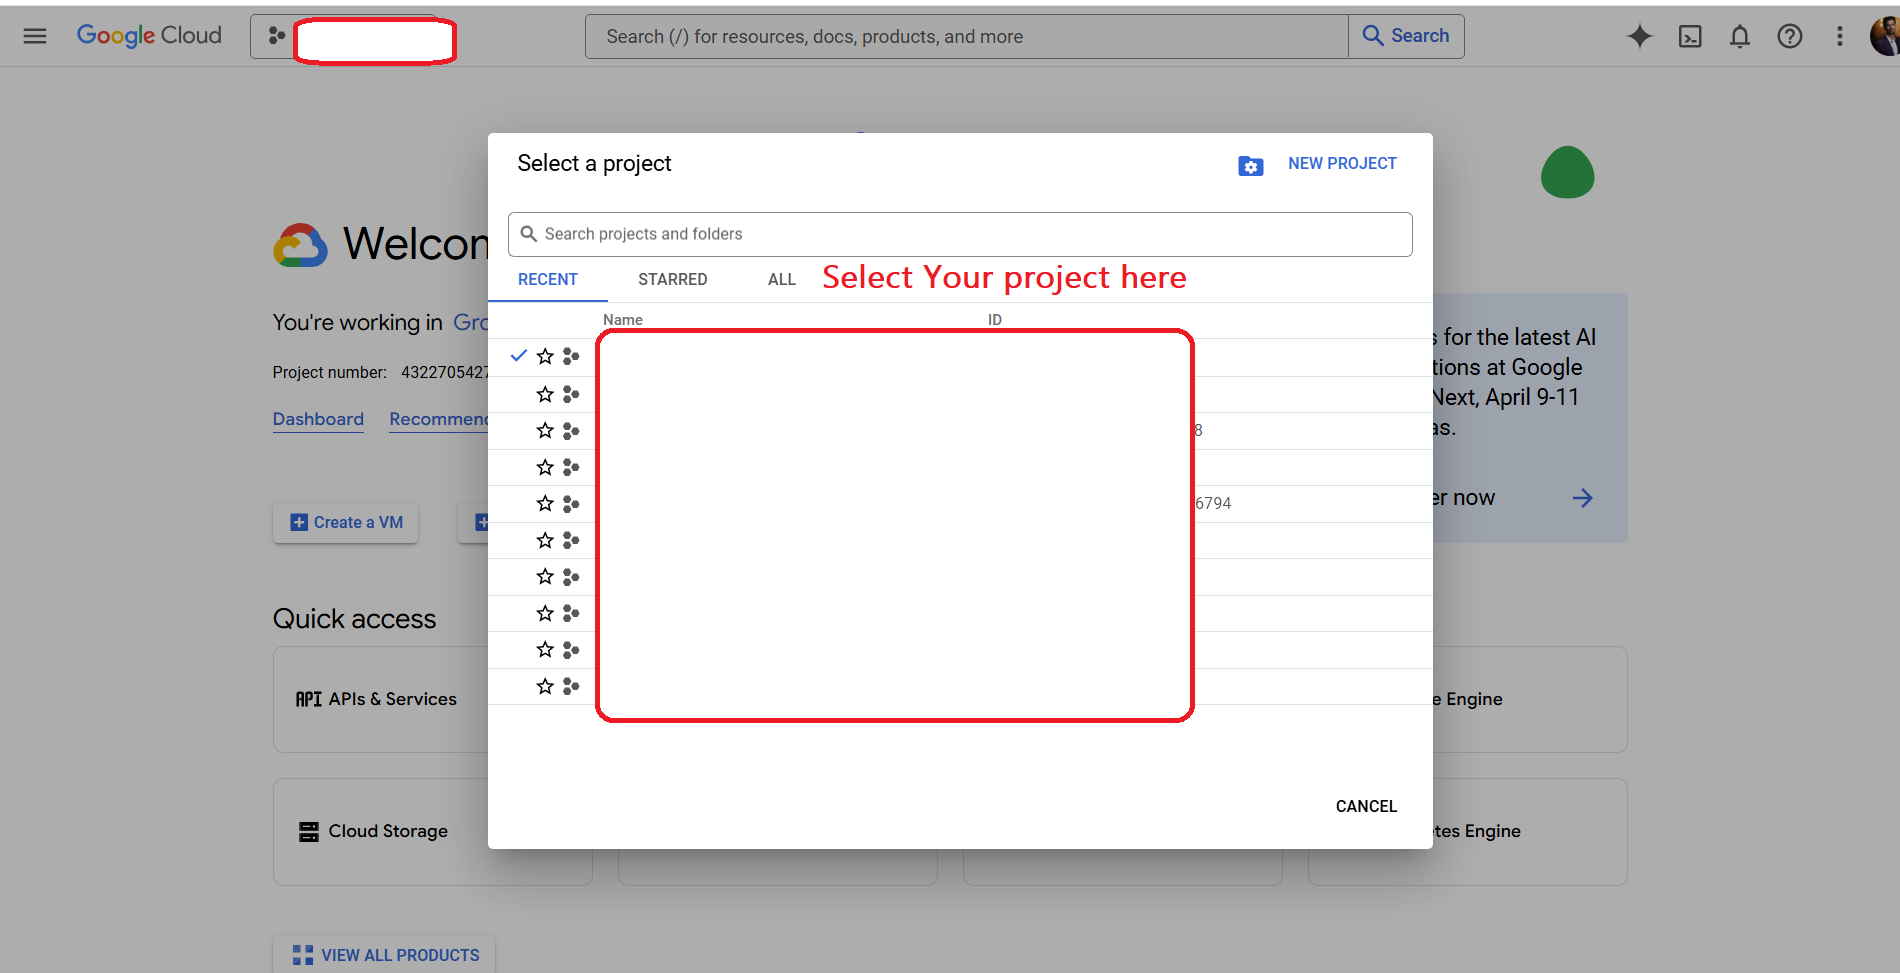
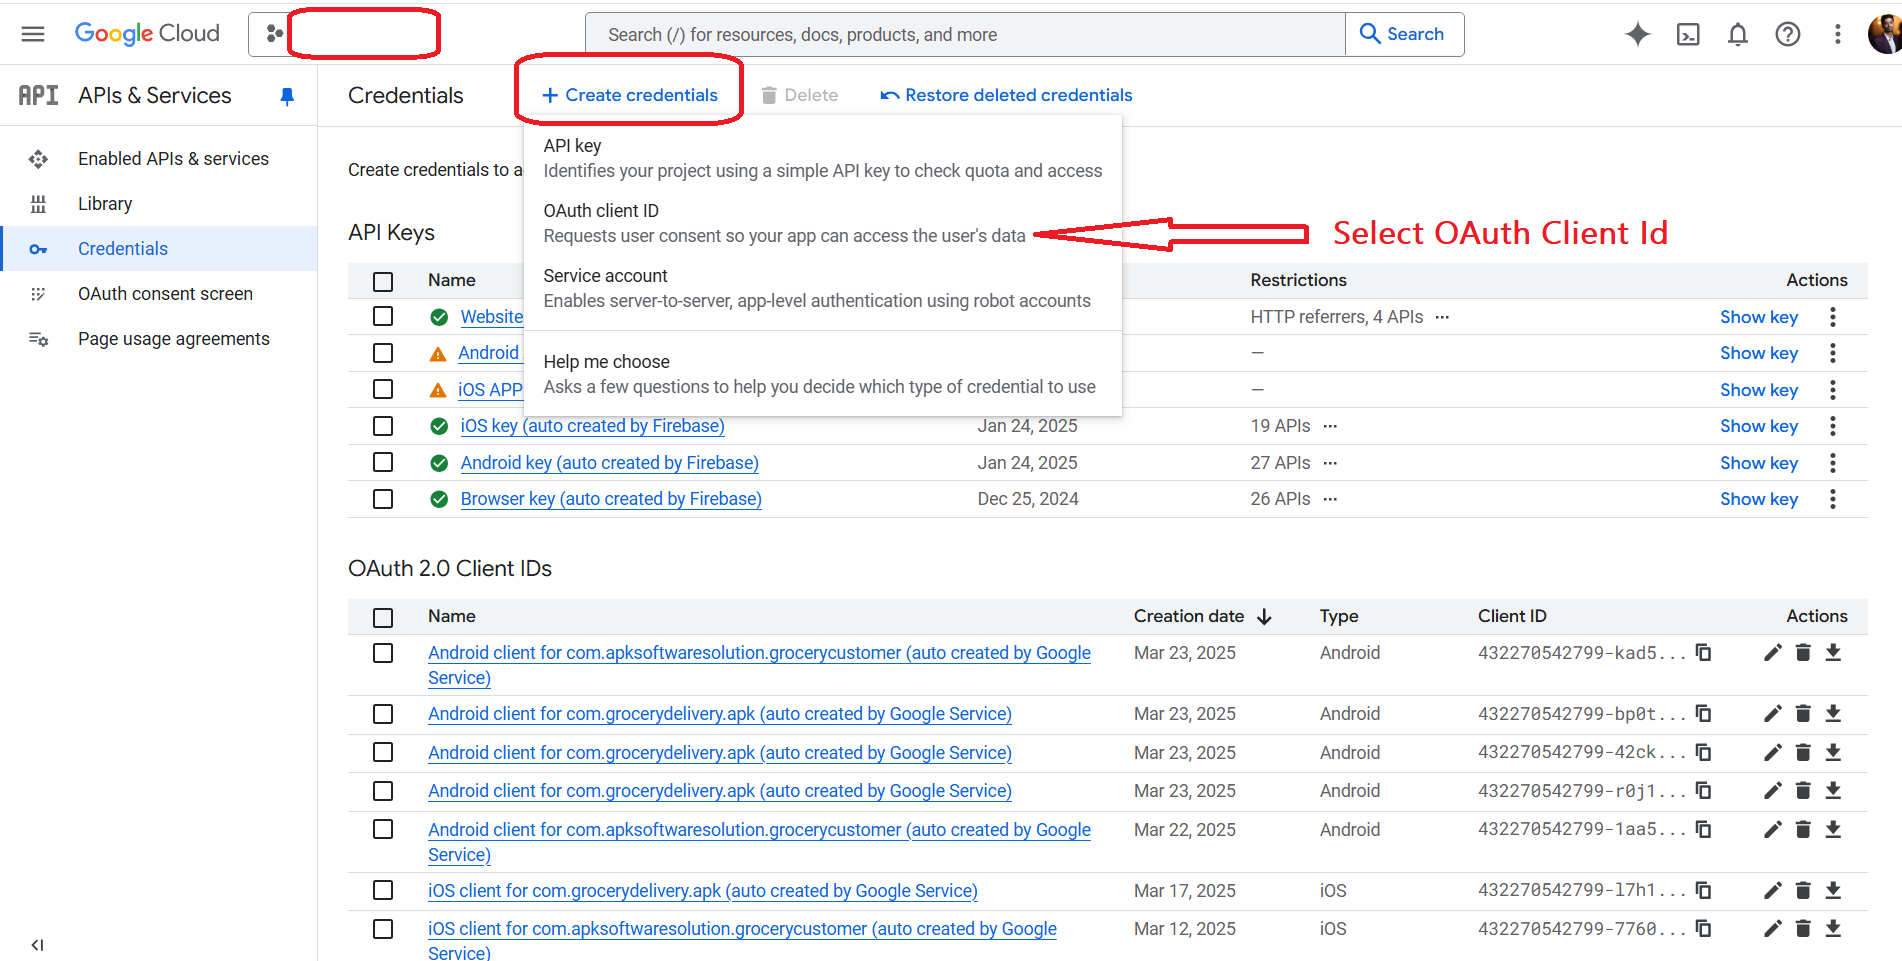
Step 2: Get Google Client Id from Google Cloud Console:
- Go to **Google Cloud Console > Select your Project**.
- How to select Proiect? Remember Project name that you have entered during create a firebase
- in above image my Project name is groceryhub-app
- Select OAuth Client Id
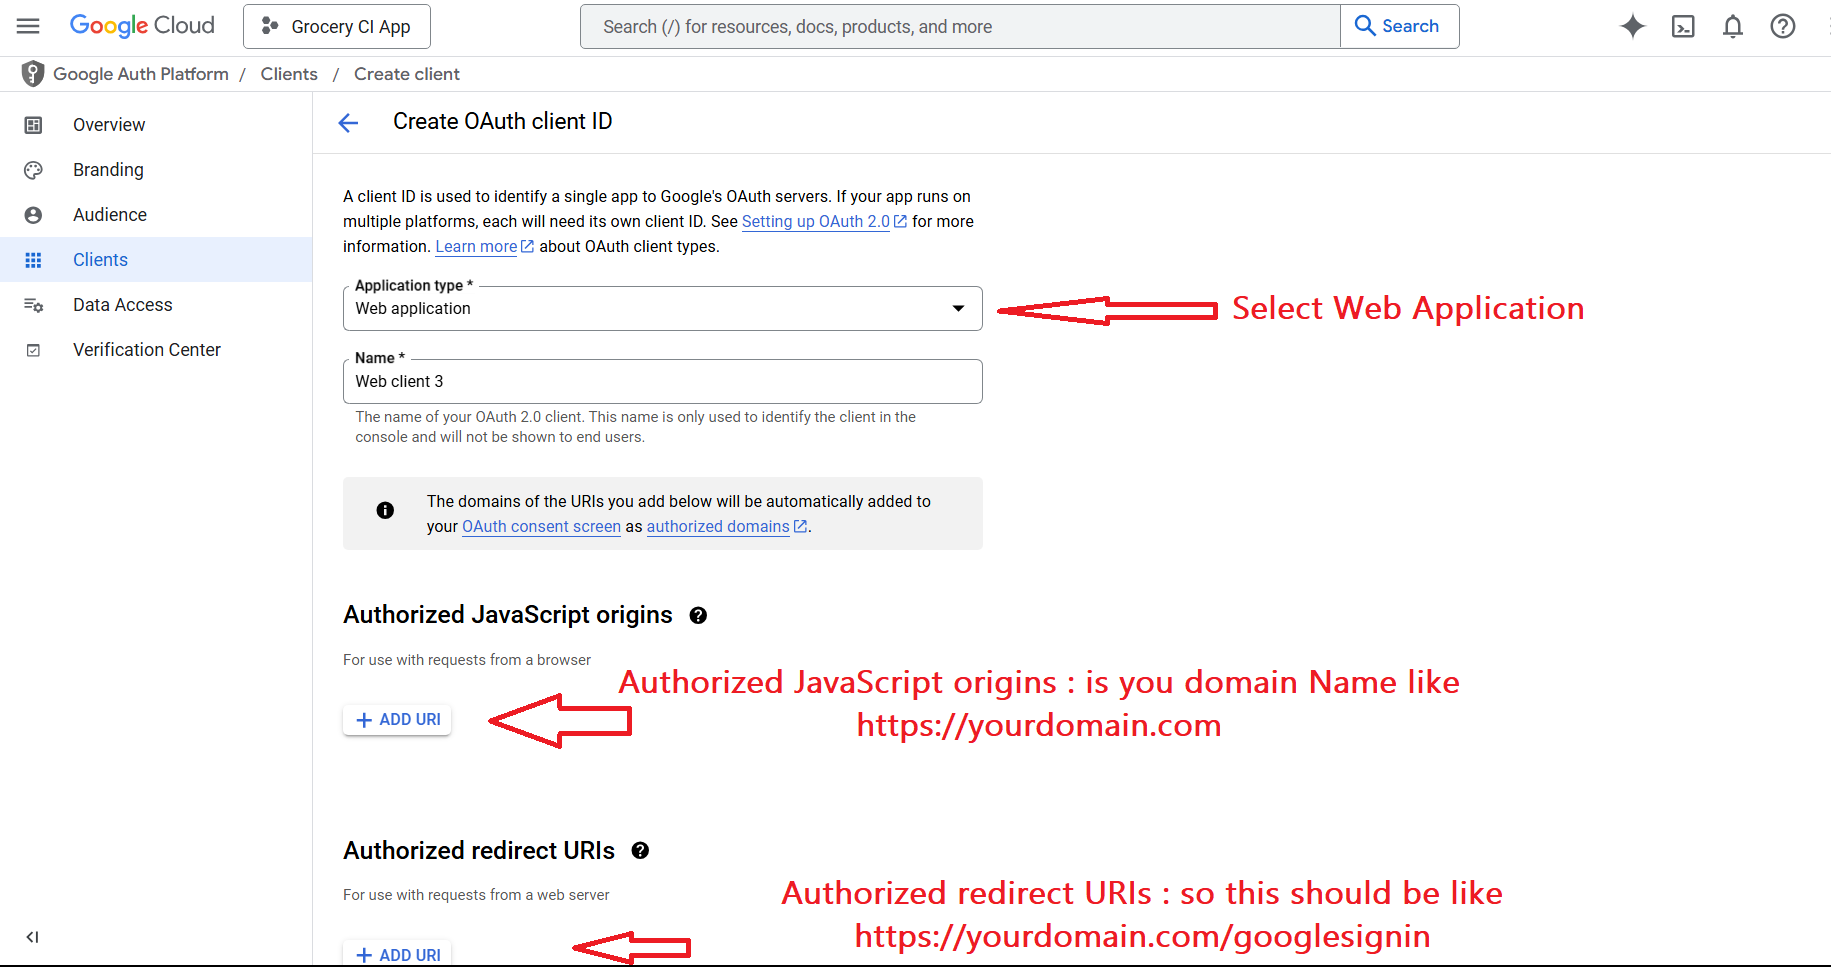
- We get below Screen, Here choose Application Type: Web Application, Enter Name:Websie google Login
- Authorized JavaScript origins : is you domain Name like https://yourdomain.com
- Authorized redirect URIs : so this should be like https://yourdomain.com/googlesignin
- then Save and you will get Clien Id and Client secrets
- Now jus Copy paste on by one on your Admin panel (here below)
Live Chat (Tawk.to Integration)
Integrate Tawk.to live chat on your website for real-time user support and engagement.
Tawk.to is a free live chat application that lets you monitor and chat with visitors on your website. Follow these steps to get and integrate the Tawk.to widget code.
Steps to Get Tawk.to Widget Code:
- Go to https://dashboard.tawk.to/ and log in or sign up.
- Click on the desired property (website) you want to manage.
- Go to Administration (gear icon) in the left sidebar.
- Under the Channel section, click Chat Widget.
- Click the Copy Widget Code button to copy the JavaScript embed code.
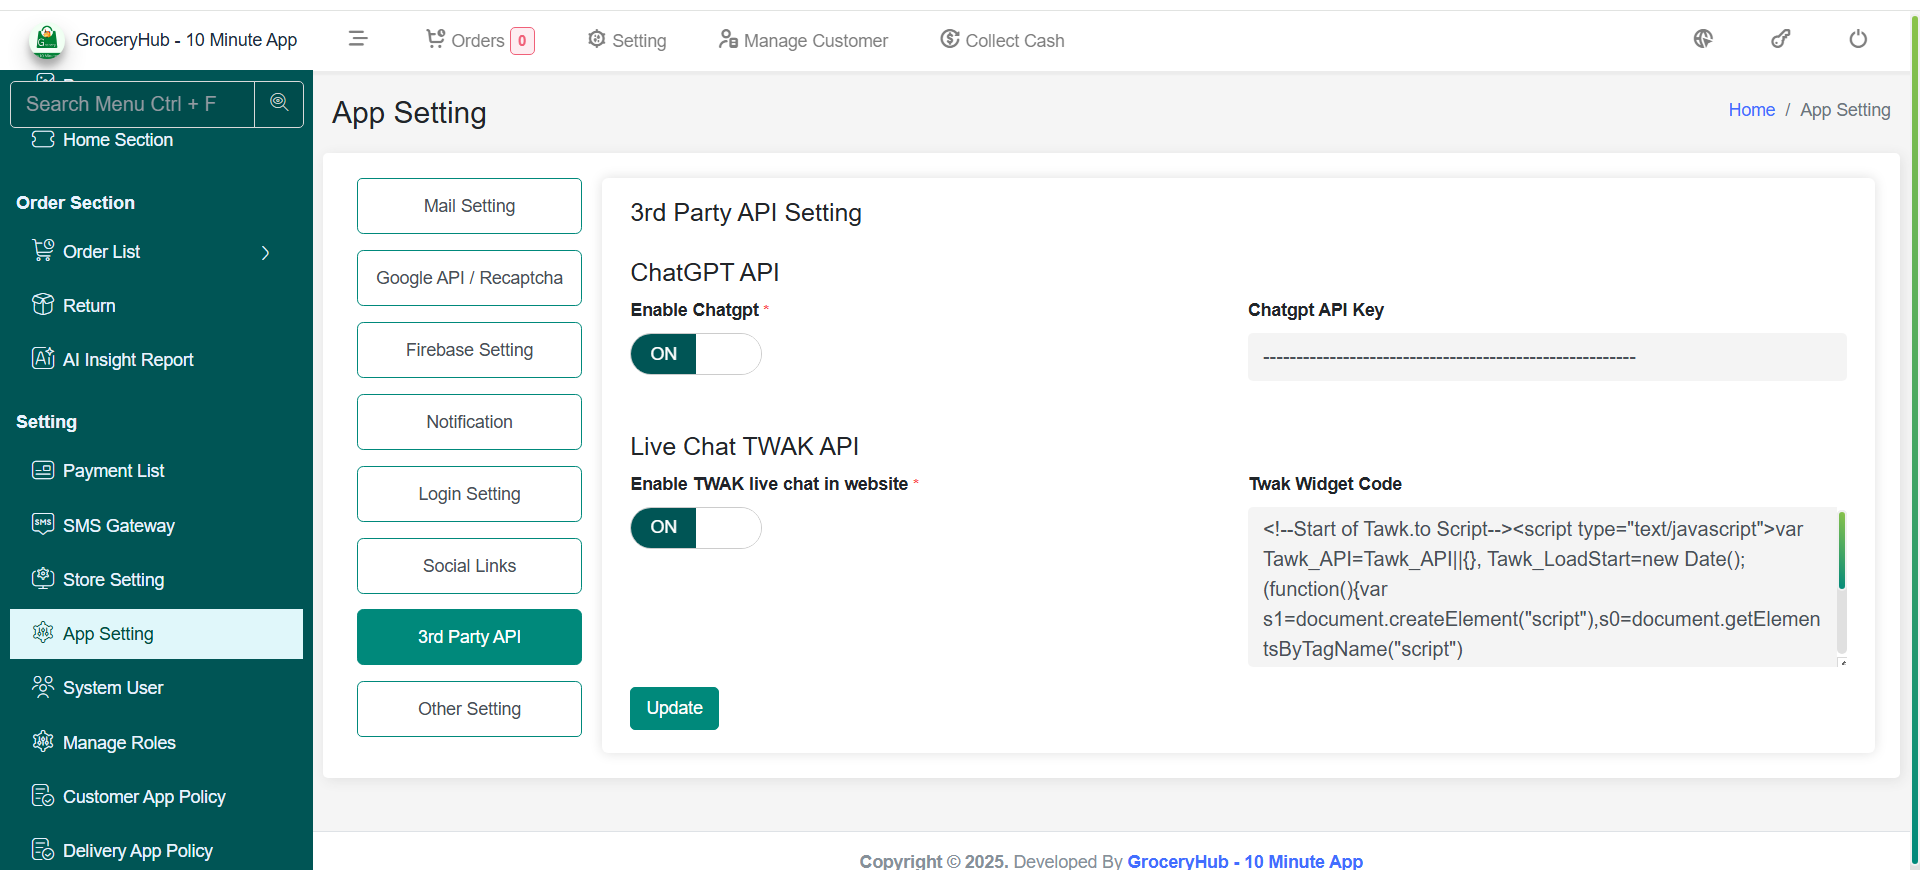
How to Save Widget Code in Admin Panel:
- Go to Admin Panel → App Settings → 3rd Party Settings.
- Paste the copied Tawk.to widget code into the provided textarea or input field.
- Click Save.
- The widget will now appear on the frontend of your website or application automatically.
Login Setting
Configure authentication methods for users.
The Login Setting section allows admins to manage authentication methods, providing flexibility for users to log in via email or Google authentication.
Login Setting
- Email Login – Allows users to log in using email and password.
- Google Sign-In – Enables Google-based authentication.
- Phone LogIn using OTP – Enables OTP-based authentication.
-
How to Enable Google Sign-In:
-
Step 1: Enable Google Sign-In in Firebase:
- Go to **Firebase Console > Authentication > Sign-in method**.
- Enable **Google** and provide a valid support email.
-
Step 2: Get Google Client Id from Google Cloud Console:
- Go to **Google Cloud Console > Select your Project**.
- How to select Proiect? Remember Project name that you have entered during create a firebase
- in above image my Project name is groceryhub-app
- Select OAuth Client Id
- We get below Screen, Here choose Application Type: Web Application, Enter Name:Websie google Login
- Authorized JavaScript origins : is you domain Name like https://yourdomain.com
- Authorized redirect URIs : so this should be like https://yourdomain.com/googlesignin
- then Save and you will get Clien Id and Client secrets
- Now jus Copy paste on by one on your Admin panel (here below)
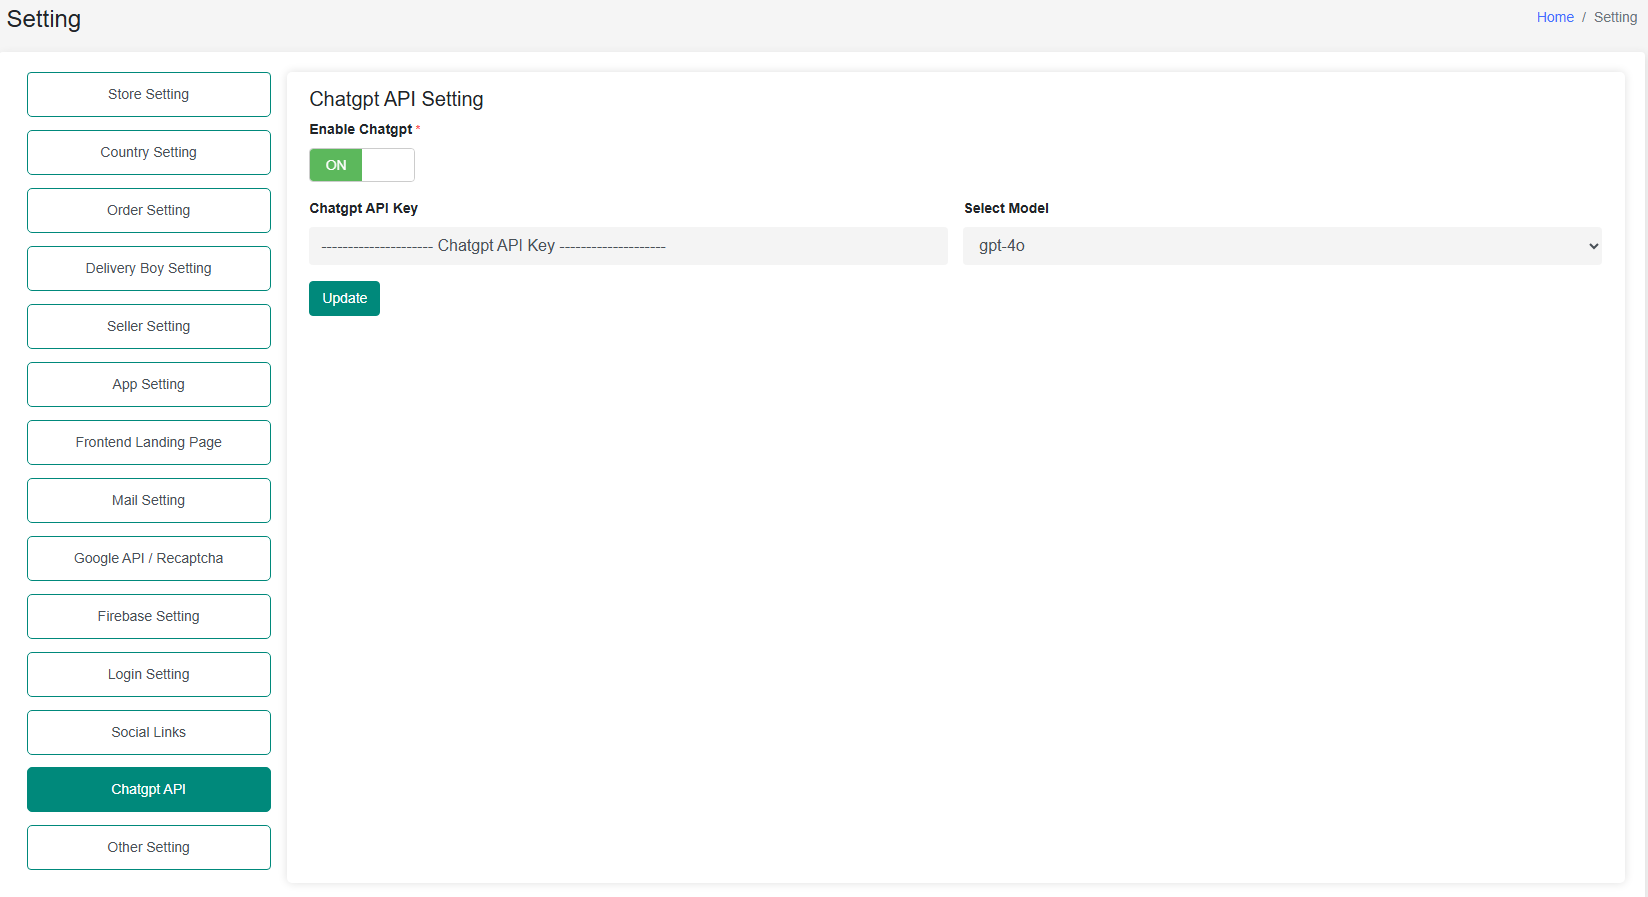
ChatGPT API
Integrate OpenAI’s ChatGPT to generate SEO content and AI-driven business insights.
The ChatGPT API setting allows admins to configure OpenAI’s AI services for SEO content generation and business insights.
ChatGPT API
Leverage AI-powered features such as content creation, automated responses, and data-driven insights.
How to Get ChatGPT API Key:
- Sign up at OpenAI.
- Navigate to API Keys and generate a new key.
- Copy and paste the API key into the admin panel settings.
-
Support
How to get assistance
Thank you for purchasing our product! For any support or assistance, feel free to reach out to us via the provided email address. Our dedicated support team is available 24/7, ready to help with any questions, technical issues, or inquiries you may have. We are committed to providing prompt and reliable assistance to ensure a seamless experience with our product. Your satisfaction is our priority, and we are here to support you every step of the way.